
Last year for Valentine’s Day our baking group did a cookie exchange, and Sarah brought pizzelle. I don’t think I had ever had one before, but they struck a nostalgic chord with me, being that they are Italian cookies flavored with anise.
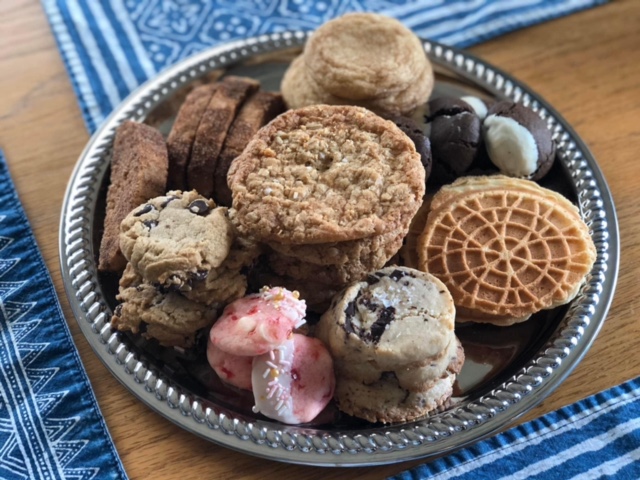
Cookies from our cookie exchange; Sarah’s pizzelle at 3 o’clock.
Pretty much anything flavored with anise is going to be a huge hit with me, like these almond-anise biscotti. Growing up in St. Louis, we would often go to the Italian neighborhood known as “The Hill” to do a little grocery shopping at Viviano’s. The second you walked in, you would be hit with all of the wonderful aromas – freshly baked bread, strong cheese, olives, olive oil, coffee, and yes, you’ve got it, anise.

Anise seed: I buy it in bulk.
My mom loved all things Italian, but perhaps especially the cookies. When we couldn’t make it to The Hill, she would sometimes bring home Stella D’Oro cookies from the corner grocer. I especially remember these cookies during the holidays – all different shapes, different colors, and all of them crispy and delicious. So how could I not just adore pizzelle? Thin, light, airy and crispy wafers, delicately flavored with anise of course; a perfect accompaniment to a good cup of tea or coffee.

I sprinkled these with a bit of powdered sugar; not necessary, but adds a festive touch.
So this year, Nicole from our baking group asked about pizzelle, and asked if anyone had a good recipe. I remembered Sarah’s phenomenal pizzelle from last year, and turns out she used Martha Stewart’s recipe. Since I never followed up on my obsession last year, I decided it was time. Luckily for me, my neighbor up the street has a pizzelle iron*, which she kindly loaned to me. I pulled up the Martha Stewart recipe and got busy.

They make festive holiday gifts!
I am always at a loss when recipes have flour measurements in volume, but not weight. Sometimes the author of the recipe is heavy handed with their flour. Other times, they are not. So I usually try the recipe first going with something middle of the road, like 130 grams of flour per cup. Then I tweak it back and forth until I find the perfect amount for me. In this case, I ended up making 5 batches before being satisfied (one of the batches was a different recipe that seems to be the standard that you will find everywhere, and I did NOT like it). In the end, Martha Stewart’s recipe is just lovely. I need look no further. So here I am, sharing it with you, along with a few tips to make the process a bit easier. Buon Natale!

Anise Pizzelle
Makes approximately 2 1/2 dozen pizzelle
- 5 tablespoons unsalted butter, melted and cooled to room temp
- 1 1/2 teaspoon anise seeds, lightly toasted and ground
- 1 1/4 cups (150 grams**) unbleached all-purpose flour
- 1/2 teaspoon baking powder
- 1/2 teaspoon kosher salt
- 2 large eggs
- 3/4 cup granulated sugar
- 1 teaspoon vanilla extract
- 1 teaspoon anise extract
- Melt the butter and set aside to cool.
- Toast the anise seeds in a skillet over med-high heat for about a minute, until they are fragrant. Pour into a bowl to cool.
- In a small bowl, whisk together the flour, baking powder, and salt.
- Using a mortar and pestle (that’s what I use) or a spice grinder, grind the anise seeds until mostly fine. Add to flour mixture and whisk in.
- In a large bowl, whisk together the eggs and sugar until light in color. If using a whisk, this will require a little elbow grease. I use an electric hand mixer to make it easier. Takes a minute or so with the hand mixer. Takes a little longer with the whisk.
- Add the vanilla and anise extracts to the egg mixture; whisk until well incorporated.
- Continue to whisk the egg mixture as you slowly pour in the melted butter. Mix well.
- With a wooden spoon or danish whisk, stir the flour into the egg mixture little by little, maybe a cup at a time. Keep adding flour until all of it is incorporated. Do not over mix.
- Your batter should be the consistency of a thick cake batter, and it should look glossy. Leave batter to rest on your kitchen counter, lightly covered, for about an hour or two. This step is optional, but I find the batter is easier to work with once it has rested and the flour has become more hydrated.
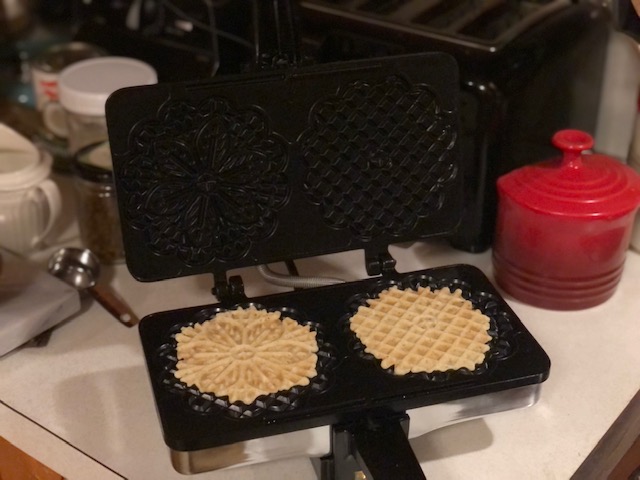
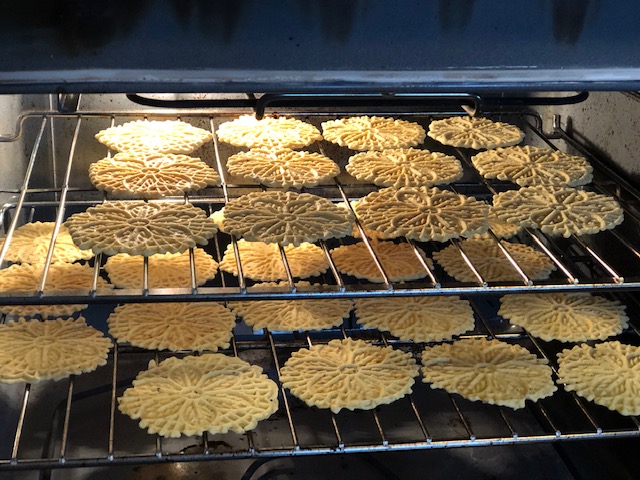
- When ready to get started, preheat your pizzelle iron for at least 15 minutes to make sure it is evenly heated. Once preheated, brush lightly with oil. You will only do this once. Place a 1 tablespoon dollop of batter in the center of each pizzelle pattern on the iron (I use a one-tablespoon cookie scoop and it works really well). You can place the dollop slightly back of center to try to get the cookies to be well centered once flattened. After a couple of tries, you will find what works best. Close the iron and bake for 40 to 60 seconds, or until the pizzelle are a light golden color. You’ll need to practice a little to get them just the way you like them. Remove using a thin plastic or bamboo knife to get under the edge, and let cool completely on a cooling rack (no overlapping). For consistent results, close the iron and let it come back to temp every time; this only takes a minute or less, so it’s worth it. Store pizzelle in an airtight container. These keep well for up to a month, if they last that long. The flavor and texture improve as they age. Serve with your favorite hot beverage or ice cream.
- If you would like to make cannoli shells**** or ice cream bowls, shape the pizzelle immediately after removing from the iron. They will harden up quickly – in about a minute. For cannoli, wrap the pizzelle around a wooden dowel or handle of a wooden spoon and hold it there for about 30 seconds before releasing to cool. For ice cream bowls, turn a drinking glass upside down, and place pizzelle around the bottom-now-top to shape it. Remove after one minute and allow to cool on cooling rack
Notes:
*The pizzelle iron my neighbor loaned me is a CucinaPro non-stick pizzelle maker, and it works well. But for my own, after doing a lot of research, I have ordered a pizzelle iron from C. Palmer Mfg. Co. Inc., a family owned and run company founded by an Italian immigrant (Carmen Palmieri) in the 1940’s. I get excited about things like this. I will give an update as to how the machine works… stay tuned.
**If you are not using a kitchen scale, stir your flour to aerate and fluff it up before lightly sprinkling your flour by the spoonful into measuring cup, and use the straight edge of a knife to level the flour. By this method, your flour should weigh approximately 120 grams per cup, and 1 1/4 cup would weigh 150 grams. If you use more flour for this recipe, up to 180 grams, the pizzelle will be a little more cake-y/less crispy… lighter in texture. Still good, but I prefer them on the crispy side. Any time your pizzelle come out not crispy enough, you can always put them directly on an oven rack in a 150° oven and let them crisp up. Maybe leave them at this temperature for 15 minutes or so, and then turn the oven off and let the cookies stay in there until they come to room temp. That should do the trick.
***For chocolate pizzelle, add 3 tablespoons cocoa (high fat if possible) and an additional 3 tablespoons of granulated sugar to the recipe. They are ridiculously delicious.
****To make a traditional cannoli filling for 8 cannoli, press 1 cup whole milk ricotta between layers of paper towels to remove excess moisture. Mix strained ricotta with 1/4 cup plus 2 tablespoon (~45 grams) powdered sugar, 3 tablespoons (~30 grams) finely chopped bitter-sweet chocolate, or you can use mini chocolate chips, and a good dash of cinnamon. Pipe into cannoli shells using a piping bag with a large round tip, or a ziploc bag with the corner cut out of it. Do this just before serving so the shells don’t get soggy. If you like, you can garnish the ends of the cannoli with finely chopped toasted pistachios, and sprinkle powdered sugar over the tops. Finally, if the ricotta texture is not to your liking, you can fold in some whipped cream to smooth it out a bit. But I would highly recommend trying the straight ricotta filling first, for an authentic experience. This recipe is from Cooking Classy.
And now, a few pics of the process:

Batter is thick and glossy.

This cookie scoop makes things a lot easier.

Dough is slightly back of center.
Light golden brown is perfect for me.

Some are cooling, and one is being shaped for cannoli.
This batch wasn’t crisp enough, so they are crisping in a 150° oven.

Cannoli!
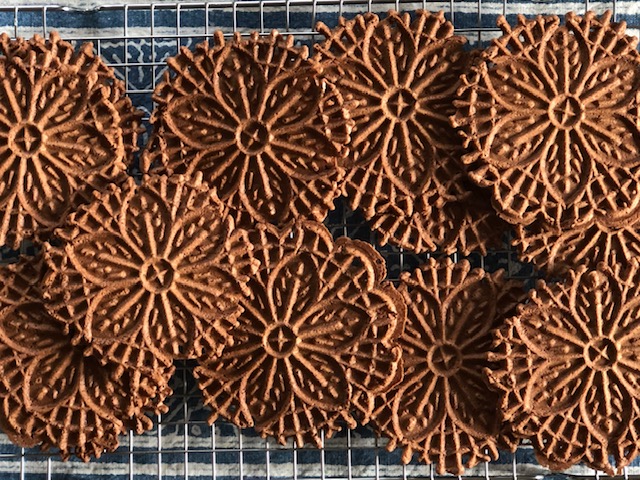
Chocolate Pizzelle
And just for the fun of it, I’m including a few pictures from our cookie exchange last year, which was hosted by Prashanthi, owner of Makeda & Mingus – an adorable café in the Greenwood neighborhood in north Seattle. While we were there, Prashanthi made me the absolute best rose cardamom latté – out of this world, and the perfect accompaniment to Sarah’s pizzelle!

I can’t wait to do another cookie exchange with these bakers!

A few of us, from left to right: Prashanthi, me, Deb, and Jill

You are a true kitchen artist. Fun to see our pic up there too! 🙂
You are a total sweetie, my fellow kitchen artist! Let’s do another cookie exchange soon!