
This is a variation of my white whole wheat sourdough sandwich bread. I love that bread so much, but it is baked in a loaf tin, and if I want to serve sourdough at a dinner party, I don’t want it looking like a sandwich loaf! I didn’t know if it was possible to reproduce this bread and have it turn out looking like an artisanal loaf, but I thought it was worth a try, and this is how my new favorite sourdough loaf was born.

Nice oven spring.
And here is why I call it soft. One of the things that drives me crazy about sourdough bread is that when it is baked at high heat, which is what everyone wants so they get that really good oven spring and a dark crispy crust, the crust is often just too hard. Or I should say it is too hard for me. So I decided I wanted to make a beautiful artisanal loaf, baked in a dutch oven, that would still have a somewhat soft-ish crust (read: it won’t break any of your teeth). Don’t get me wrong; I still like a good chewy, crispy crust. I just don’t want it to cost me a trip to the dentist.

This one has fresh rosemary in it.
So this one really fits the bill. How? Well, I bake it in a dutch oven, but at a much lower temperature. I didn’t think it would work, but it does! This loaf still works for sandwiches and toast, as it doesn’t have big holes in it. The day after it is baked, it slices up beautifully, the crust is thin and chewy, and the flavor is subtly tangy, as a good sourdough should be.

A few hole here and there, but not too many.

Makes a great sandwich! This loaf was cut on the same day it was baked.
And here is the beauty and versatility of this loaf: it can serve as a soft sandwich loaf, but it can also go on the table to be served with a saucy pasta, or any other dish that calls for a good crusty loaf. All that is required is to reheat the loaf in the oven at 350° or so, and the crust becomes perfectly crispy and delicious. For extra crispy crust, splash your loaf with water before reheating.

I know he looks like a loaf. I couldn’t resist.
Soft Sourdough Loaf
- 330 grams room temperature water (filtered if possible)
- 80 grams bubbly, active sourdough starter
- 1 tablespoon sugar or honey
- 2 tablespoons olive oil
- 450 grams bread flour*
- 50 grams all-purpose flour*
- 2 teaspoons (12 grams) kosher salt
Day #1:
- Before making this bread, you will want to feed your sourdough starter a couple of times to make sure it is good and active… maybe once every twelve hours, including the night before you want to make your bread. In the morning, in a medium bowl, mix 80 grams of your active starter with 330 grams water, 1 tablespoon sugar, and 2 tablespoons olive oil. Whisk together until it looks milky and the starter is well incorporated.
- Add the flour and salt, and mix with a wooden spoon or dough whisk until there are no dry floury bits. The dough will look shaggy.
- Cover the dough and let rest for about an hour (this is called the autolyse).
- After the dough has rested, mix the dough until it is smooth and springy: using a slightly wet hand (I keep a bowl of water handy), grab the dough from the side of the bowl and press it into the center. Rotate the bowl and continue to grab and press until you’ve gone around a couple of times. This should take maybe about a minute. The dough will become more elastic and springy rather quickly. Flip the dough over in the bowl (smooth side up), cover the bowl with plastic wrap or similar covering, and leave on your counter.
- After about an hour, using a bowl scraper or spatula, scrape all along the side and bottom of the bowl to make sure the dough isn’t sticking. With wet hands, scoop up the dough from the middle, letting the dough hang and stretch. Gently release the dough into a pile and rotate the bowl one quarter turn. Repeat, scooping up the dough and letting it hang and stretch. I sometimes jiggle it to encourage it to stretch a bit more. then cover the bowl and leave on the counter. These are called coil folds**, and they will help develop the gluten in the dough, giving the finished bread a nice structure. Leave the dough in the covered bowl on your kitchen counter. You can come back and do another set of folds in about an hour if you like. Then leave the dough covered for anywhere from six to eight hours, or until it has almost doubled in size, and has a bubble or two on the top.
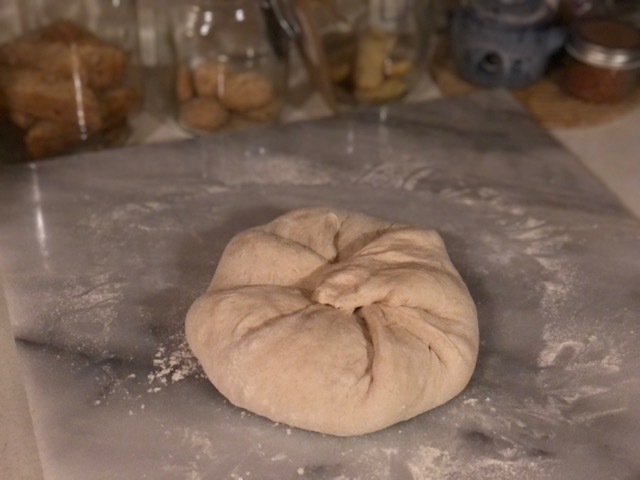
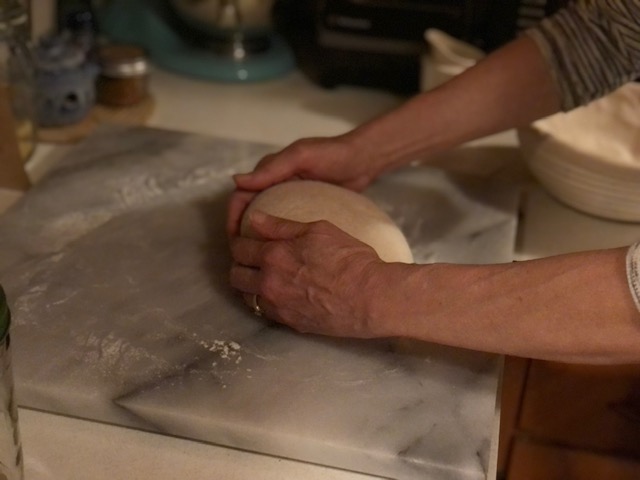
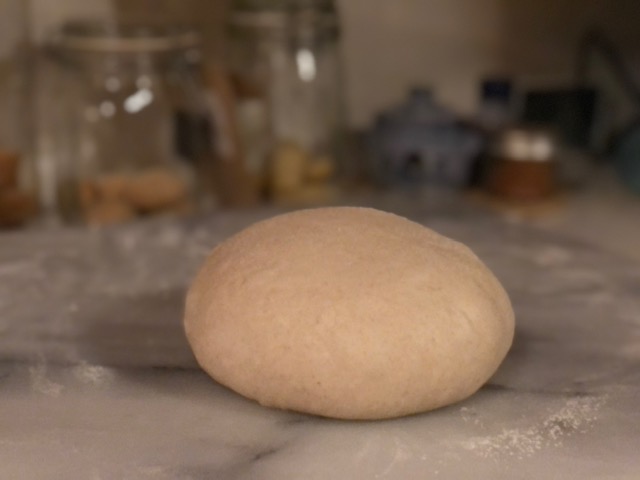
- Once the dough has almost doubled in size, gently scrape the dough out onto a lightly floured work surface using a spatula or bowl scraper. It is time to shape your dough. Take your fingers and slide them under the sides of the dough and gently stretch the dough out a bit to make a large circle. Lightly flour your finger tips and, acting like you are playing the piano, gently dimple the dough. This helps to minimize large holes in your bread. Fold the sides of the dough into the center, starting at one side and continuing until you have gone all the way around, brushing off any excess flour as you go. Flip the whole thing over with the assistance of a bench scraper or bowl scraper. The dough will be “smooth side up”. Now cup the dough with your hands and draw it towards you, pressing slightly under as you go. Rotate the dough a quarter turn and repeat. Do this several times, but gently! You don’t want the dough to tear. You want the dough to be evenly round, and to feel taut and a bit springy. Once it is shaped nicely, let it rest for ten minutes.
- While the dough is resting, grab a colander (or bowl) and clean, dry tea towel. Flour the tea towel. Line your colander with the floured tea towel, floured side facing up. After your dough has rested for 10 minutes, lightly flour the top of the dough and smooth out the flour to have a nice even layer. Carefully pick up your dough with the assistance of a bench scraper or bowl scraper and gently flip it over, and place your dough smooth side down into your prepared tea towel/colander**. Lightly flour the seam side of the dough and cover lightly with the tea towel. Place in fridge to rest and rise overnight.
Day #2:
- You can get started any time you feel like it. When you are ready, place your dutch oven and lid into your oven on the middle rack, then preheat the oven to 375°F***. Let oven and dutch oven preheat for 20 minutes or a bit more.
- Once the 20 minutes are up, take your bread dough out of the fridge. Open up the tea towel. Take a square of parchment paper and lay it on top of the dough. Place a plate on top of the parchment, and flip the whole thing over. Remove the colander and the tea towel. Using a sharp knife or razor blade, make a big slash about 1/4 inch deep across the loaf. If you wish, you can cut more designs making the cuts very shallow.
- Using oven gloves or mitts, take your dutch oven and lid out of your oven. Be careful, as it will be very hot. Take a hold of the dough by the corners of the parchment paper, and drop the loaf into the dutch oven. Shake it from side to side to make sure the loaf is centered. Put the lid on and place in your 375°F oven and bake for 45 minutes. The lid stays on the entire time.
- When the 45 minutes are up, remove the dutch oven and carefully lift out your beautiful bread. If you have a quick-read thermometer or thermapen, check the internal temperature of your loaf – it should be somewhere between 205°F and 210°F. If you don’t have a thermometer, you can usually tell your loaf is done by the light golden brown color, and if you tap on the bottom of the loaf, it will have a hollow sound. Let the loaf cool on a cooling rack for at least two hours before cutting into it. Enjoy!
Notes:
* Lately I have been making this bread using Cairnspring Mills Expresso Bread Flour. I have been using their Sequoia All Purpose Flour to soften the bread a bit. Both of these flours have more bran and germ than most other flours, so the result is an earthy loaf. If you are lucky enough to be in the area and get your hands on some of this flour, I highly recommend it. If not, another blend of flours I like for this loaf is King Arthur Bread Flour (200 grams), plus King Arthur All Purpose Flour (100 grams), plus King Arthur White Whole Wheat (200 grams).
** I now use a proofing basket (also called a banneton) with a linen liner instead of a colander and tea towel. Either set up works well. The banneton takes up less room in the fridge (and that is important because our fridge is small!), and I can easily clean the liner by rinsing it in hot water and hanging it to dry on a hook in my kitchen. When using the banneton and liner, I just use one of those reusable shower cap-style covers on it when I put it in the fridge for the overnight rise. Super easy.
*** Update! Recently I have started to preheat my oven and dutch oven to 450°F so I get better oven spring (that initial rise from the blast of heat), but I immediately turn the oven down to 375° once the bread is in the oven, and I still bake the bread covered the entire time. You may want to try this if you find you are not getting the oven spring that you would like, but don’t forget to turn the oven temp down to 375°, that’s the risky part.
Here are some pictures of the process:

Use an active starter that has at least doubled.
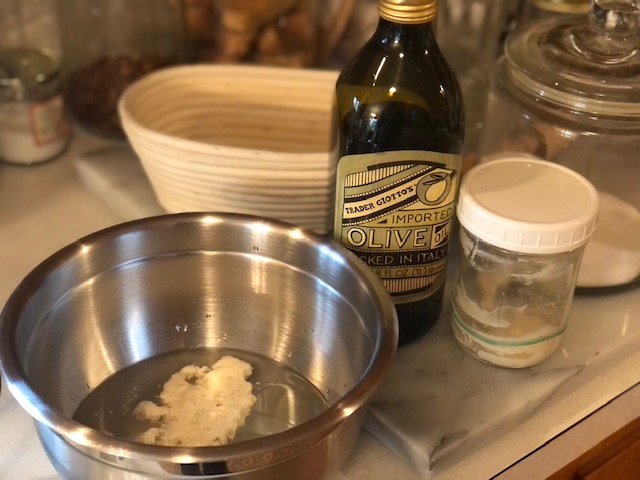
Put water, starter, olive oil and sugar in medium bowl.
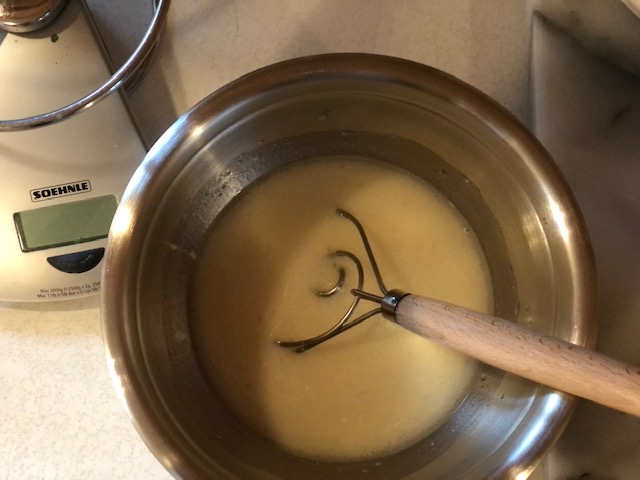
Stir water, starter, sugar and oil until milky.
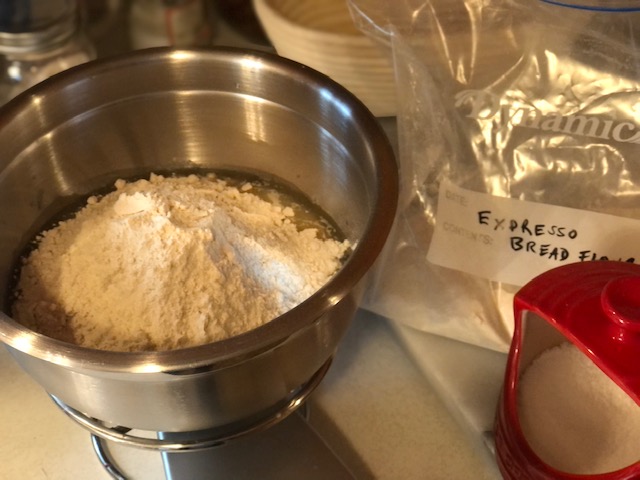
Add the flours and salt.
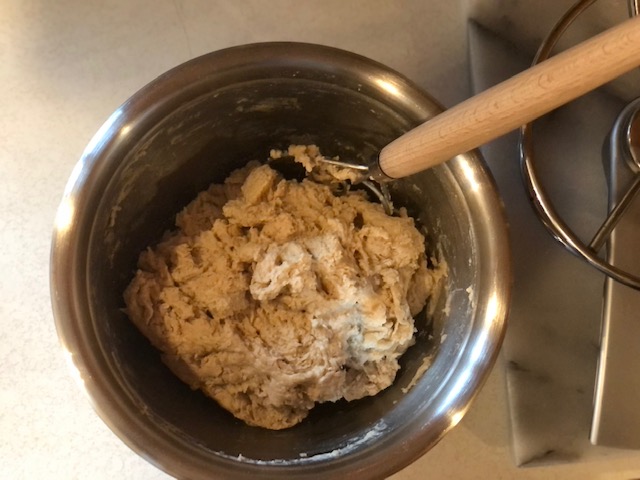
Mix until there are no more floury bits.

Cover and let rest for about an hour.

Mix again with a wet hand, bring the dough from the sides into the center, going all the way around until dough is smooth and springy.

Then flip the dough over. Nice and smooth.
Cover again and let rest for another hour.

Time for a fold. Stick your hands underneath and lift the dough up.

Lift it nice and high so the dough can stretch. Then drop it back down onto itself.

Rotate the bowl a quarter turn and do it again.
Cover bowl and let rest for 6 to 8 hours, or until dough has almost doubled.

Almost doubled and ready to go!

Scrape the dough out onto a floured surface.

Stretch the dough gently into a wide circle, and dimple the dough.
Fold the edges of the dough into the middle, going all the way around.

Flip it over so it is “smooth side up”.
Draw the dough toward you, rotating the dough and repeating until there is nice tension.
Nice and springy with good tension.

Flour the top of the dough.
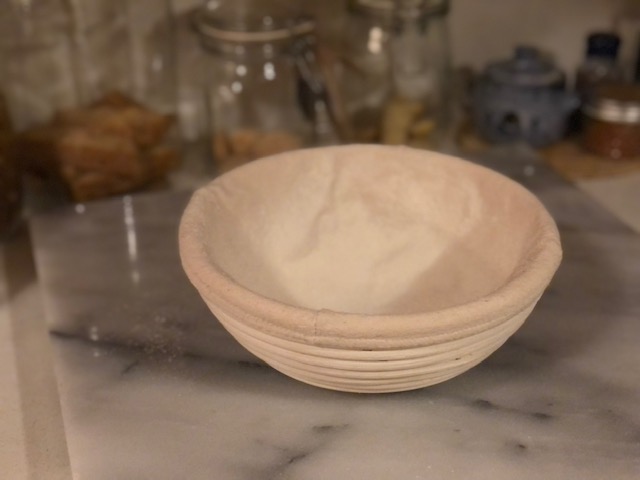
Flour your banneton liner or your tea towel/colander set up.

Tea towel/colander set up looks like this.

With the assistance of your bowl scraper, flip your dough into the lined banneton or colander so the smooth side is down and the seam-side is up.
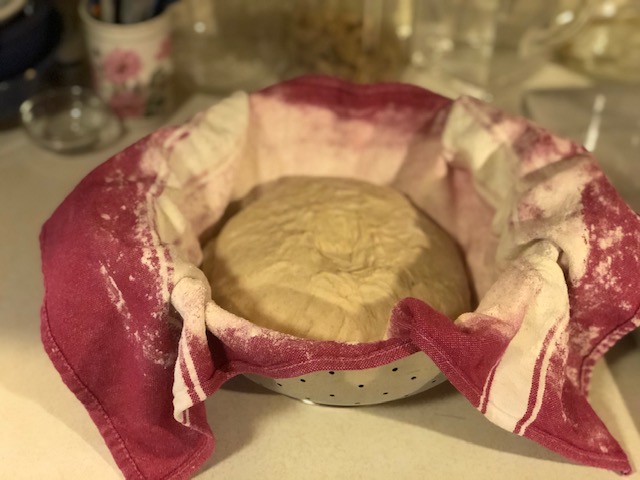
Tea towel/colander set up looks like this.

Cover with plastic wrap or a reusable cover, and place in the fridge to rise overnight.
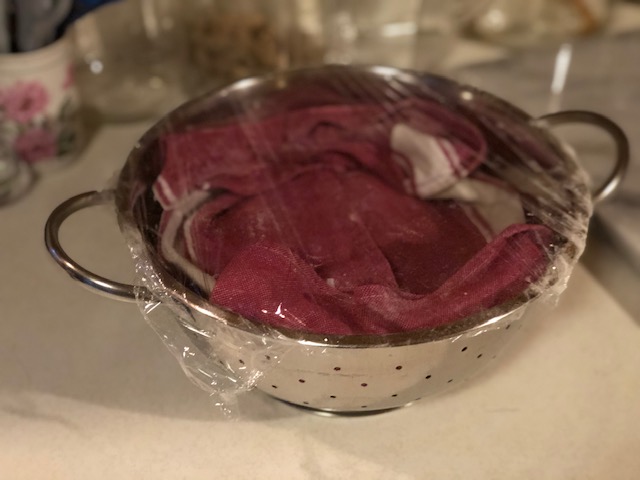
If using tea towel, fold over the edges of towel and lightly cover with plastic wrap. Place in fridge overnight.

Day #2: Place dutch oven in your oven and preheat to 375° for at least 20 minutes.

Once oven is preheated, remove dough from fridge and remove cover. It should be nice and puffy!

Cover with a square of parchment paper.

Flip the whole thing over.

Remove basket/colander and liner.
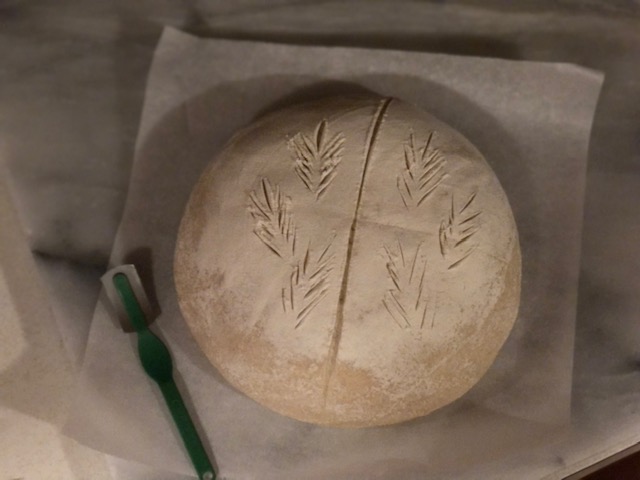
Make a 1/4″ cut across the loaf with a sharp knife or razor. You can also make more shallow decorative cuts.

Carefully remove dutch oven from oven and plop your bread and parchment paper inside of it.

Cover and put back in oven. Bake for 45 minutes covered the entire time.

After 45 minutes, remove dutch oven and carefully remove the lid (there will be steam).
Place your work of art on a cooling rack and let cool for at least 2 hours before cutting into it.

This one I reheated in a 350° oven to give it the dark, crispy crust.

Looks beautiful and delicious! And I very much appreciate all the step by step pictures— so helpful!
Thank you so much, Lisa! I’m glad the pictures were helpful :). It’s a little crazy trying to get all the details in pictures, but if it’s helpful then it’s all worthwhile. Thanks for reading, and thanks for your comment!
Pingback: Soft Sourdough Loaf — and everything nice | My Meals are on Wheels
Iv paid nearly 100.00 for promising sourdough courses that didn’t offer near the information and instruction with lovely informative photos as your free soft crust course. Thank you your the best.
Thank you so much, Marcile! This means the world to me, and you have brightened my day!
Mine turned out a bit gummy.
Oh no! Sorry to hear that, Yolanda. There are SO so many reasons that can happen. It could be that your starter wasn’t active enough (that’s my first guess). Or maybe your oven runs cooler (I always keep an oven thermometer in my oven to be sure it’s at the correct temperature). Or maybe the dough over-proofed (rose too much before baking), so that it used up most of its oomph before going into the oven. Or maybe it just needed to be baked longer (I often will check the interior temperature of my bread when taking it out of the oven using a thermapen to make sure it has reached about 205°F). This is making me think I should add a trouble-shooting section to this post! When I first started making sourdough bread, my loaves came out gummy all the time; so frustrating! I am pretty sure that my starter was not active enough. Now, years later, I am still using the same starter, and it is VERY active. I haven’t had a gummy loaf in years. Sometimes my loaves don’t rise as much, there are so many variables. But they are not gummy. So that leads me to believe it’s a starter issue. If you try making it again, let me know how it goes!
What should the internal temp be on this sourdough?
Hi Patti! I usually aim for somewhere between 205° and 210°. Thanks for your question; I need to add that to the post.
I made this bread today. It was fabulous! I did have to bake it an extra 20 minutes to come to temp but that is ok. I dont think I will make my sourdough bread any other way. Thank you for your post!!
This makes me very happy! Thanks for letting me know!
Hi again Patti,
I just reread my post (since it is over a year old), and I realize that lately when I preheat the oven, I have been preheating it to 450° to get a better oven spring. As soon as I put the bread in the oven, I turn the temperature down to 375° and bake covered the entire time so I still get that nice soft loaf, but better rise, and also a slightly darker crust. I updated the post in the notes, and I thought about you, since you mentioned it took your bread longer to come to temp. Wondering if this would make a difference.
Thank you for responding, Angela! I just use the longer bake time and it is coming out just perfect. I cannot tell you how happy I am to have found this soft recipe. I cook for my in-laws a few times a week and adding this fresh, soft sourdough bread to their dinners has put some smiles on those beautiful faces. I too, am happier as I am not tearing up my gums trying to eat the crunchier version lol.
I’m so glad! Thanks so much for letting me know.
Just pulled this one out of the oven. Can’t thank you enough for your recipe@
Sent from my T-Mobile 5G Device Get Outlook for Androidhttps://aka.ms/AAb9ysg ________________________________
Hi Patti! It looks like you tried to send a photo – wordpress doesn’t let you do that in comments so I can’t see it, but I bet your bread is gorgeous!
Pingback: Easy Sourdough Starter Maintenance | and everything nice
I’ve made this recipe about 4 times now and they’ve all turned out fantastic. Great sour taste and none of the super crunch that can break your teeth. My husband also prefers softer bread- this is perfect!!!
Kaycee, I’m so happy to hear this! It’s still my go-to recipe for a beautiful loaf of sourdough when we are having guests or are invited to dine. Keep an eye out, because soon I’ll be posting my latest favorite sandwich loaf :). Thanks so much for your comment, and for reading my blog!
I have tried so many different sourdough recipes since I started my sourdough journey during covid. None have been as easy to follow with such beautiful and delicious results. No more toothaches from rock hard crusts! And as a visual learner I so appreciate your photo instructions. Greatly appreciated! Thankyou so much.
Christine, thanks so much for your lovely comment – it made my day!