Easy Sourdough Starter Maintenance

I posted about sourdough starter maintenance a few years ago, but wanted to write a new post that reflects what I do now. I have completely simplified, and don’t like to have discard. I always keep my starter in the fridge, in a 16 ounce, straight sided Ball or Kerr canning jar. I usually keep between 30 and 40 grams, which is a little less than a quarter cup.

30 grams is not a lot, but it’s enough to get you started, haha.

If I know I want to bake a loaf of bread, the night before, I pull my jar of starter out of the fridge just before bedtime. If my recipe calls for 80 grams of starter, for example, I will add to my jar: 50 grams of water and 50 grams of flour. If you do the math, it looks like this: 30 grams starter from the fridge + 50 grams water + 50 grams flour. I like to make a bit more than I actually need to account for a small amount of evaporation that occurs.

Pour in 50 grams of water to jar containing about 30 grams of starter.

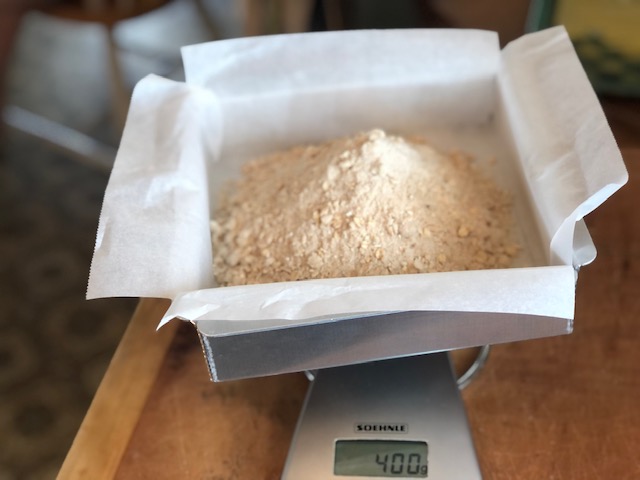
Zero out the scale and then add 50 grams of flour.

I stir well, using a narrow silicone spatula. I end up with a pasty mix.

The jar looks kind of messy.

So I scrape down the sides of the jar with the spatula so I can see what’s going on in there. I place a rubberband at the level of the starter so I can keep track of how much it grows. I put the lid on the jar just lightly so air can escape, and leave it on my kitchen counter overnight.

In the morning, I’ve got active, bubbly starter, ready for my recipe. My kitchen is not warm overnight… probably is about 66°F. This is not important, except to let you know that you don’t need a warm room to get your starter to rise.

Ready to go!

My starter usually triples in size in about 6 hours. Once it has reached its peak, it stays there for at least a couple of hours, which makes an overnight rise perfect for my schedule.

Once I use my active starter for my dough….

I will have somewhere between 30 and 40 grams leftover. I put the lid back on the jar and put the leftover starter in the fridge. It’s okay to put the lid on a little tighter, but I never screw it on all the way, just in case. My starter stays in the fridge until the next time I need it. Since I bake once or twice a week, my starter stays active and this routine works well for me.

My recipes generally call for anywhere from 80 to 100 grams of starter, but I don’t worry too much about exactness of things. My mixes of starter might look like this:

30 grams starter + 45 grams water + 45 grams flour

40 grams starter + 50 grams water + 50 grams flour

Etc., etc.

Just notice the proportions. I used to feed my starter at a 1:1:1 ratio, which will have the starter growing pretty quickly, perhaps even too quickly for an overnight rise. So now I prefer to do a 3:4:4 ratio or 4:5:5 ratio, or even a 3:5:5 ratio, so the starter doesn’t rise too quickly.

Sourdough Fruit and Nut Loaf

When I do have a recipe that calls for a larger amount of starter, like my sourdough waffle recipe, for example, I will feed my starter in the morning of the day before, a 30:45:45: mix. Then in the evening before bedtime, I will take 80 grams of the active starter, and feed it 90 grams water and 90 grams flour in a larger jar. A much larger jar. I will put the leftover starter back in the fridge. The next morning I will have a large jar with 240 grams of active starter, and I will use all of it for the waffle recipe. I still have my trusty 30 or so grams of starter in the fridge, ready and waiting for the next time I need it.

I hope this isn’t too confusing. Just so you know, I’ve had the same starter since the beginning of the pandemic, and I haven’t screwed it up yet. They say it’s hard to kill a starter, and I believe that is true.

One thing I haven’t mentioned yet is ingredients. For feeding my starter, I use filtered water from a Britta water pitcher, but I’m thinking tap water might be fine as well. For flour, I use unbleached all-purpose flour, usually King Arthur brand. I also throw in a teaspoon of rye flour when feeding my starter to keep things jazzy. It’s not necessary, but it does help increase activity.

Finally, if you are not going to bake once a week or more, you can still keep your starter in your fridge, but you may have to feed it a couple of days in a row to bring it back up to speed when you finally do want to bake. Your starter will get sluggish in the fridge if you leave it in there without feeding it for more than a week. So in this case, a few days or so before you want to bake, you will feed it every 24 hours until it is nice and active again, and you will end up with discard (starter you don’t need) at those extra feedings. Save that discard and make some crackers!

I hope you find this helpful, and please let me know if you have any questions! There are many many ways to maintain a sourdough starter; this is just one of them, and it works for me.

Posted in Sourdough | 2 Comments

Chocolate Chip S’more Cookies

First of all, I must tell you that these cookies are not photogenic. The above picture was the prettiest shot I could get, but really, they more often look like the photo below.

My baking friends Jill and Deb recently challenged me to try to reproduce the “Mackles’more” cookie from our local cookie shop, Hello Robin. I tried to ignore the challenge, but then I was at U Village the other day and had to try one. I tried to pick apart the elements of the cookie… I thought it was yummy, and seemed like it would be easy to make. So when at the grocery store that same day, I picked up all the necessary ingredients to make s’mores. Game on!

The way I made the cookies was kind of a mess, as I was shooting from the hip. I made divots into chilled chocolate chip cookie dough (I used Matthew’s Favorite Chocolate Chip Cookie dough recipe, but added an extra 1/4 cup of flour so the cookies would be less gooey. I figured there would be enough gooey factor with the addition of marshmallows and chocolate on top). I put the cookie dough balls with the divots on top of graham crackers, then put a marshmallow into each divot, and baked as I normally would.

I was dismayed that the toasted marshmallow slid over to the side, even though I had made those divots! So when I took the cookies out of the oven, using a fork, I scooched the hot marshmallow back to the center of the cookie, and then placed a piece of Hershey’s milk chocolate on top. It was a hot mess.

At first they were tall and awkward, but once the cookies cooled a bit, everything sank down,  just like a chocolate chip cookie does once it cools. And they ended up looking like that pretty picture I took :).

But listen to this: after I went through all the trouble of making these cookies based on guesswork, I decided to look online, and it turns out that the actual Hello Robin recipe is out there for anyone that wants it!! I had to laugh. Turns out they make theirs with mini marshmallows mixed into the dough, and the chocolate they use is Theo’s, which is extra fancy. So you know I had to do a side-by-side comparison.

The two on the far right are my recipe, the six on the left are the Hello Robin Recipe.

I think Jill and Deb and I all agree that there is something rather exquisite about my version, with the big marshmallow on top. First of all, it melts all over the place and makes this caramelized, crispy sugar around the edge of the cookie, which is divine. And then, I do like the idea of each cookie having the same amount of marshmallow! Marshmallow in every bite! Plus, my daughters both absolutely prefer my version, and that’s all I need to know.

My version are the two on the right; messy and glorious.

Yes, it is a bit messy, but tell me, don’t you just love a big messy s’more? The kind with marshmallow oozing out of the sides? That’s what this cookie is about. And as for the square of chocolate on top, I went for good old Hershey’s milk chocolate, since that is what we always use for s’mores. Why change a good thing?

Chocolate Chip S’more Cookies

(Makes 2 1/2 dozen cookies)

  1. Prepare a batch of your favorite cookie dough, or if you like, use my recipe for Matthew’s favorite cookie dough. If you choose to make my recipe, go ahead and add an extra 1/4 cup (30 grams) of flour, and use regular all-purpose flour instead of bread flour. Scoop the cookie dough into 1 1/2 tablespoon balls (use a cookie scoop to make this easier) and place them on a parchment lined cookie sheet (they don’t have to be far apart for this) and chill in the fridge for at least two hours.
  2. Once dough has been chilled for at least two hours, preheat oven to 375°.
  3. Line two baking sheets with parchment paper. Place 8 graham cracker squares (each square is 1/2 cracker) on each sheet. Set aside.
  4. Break each chocolate bar into 8 squares. You should end up with 32 squares.
  5. Preheat oven to 375°.
  6. Using a spice jar, press a little well into the center of each cookie dough ball. Dip the spice jar into a little bit of flour to keep it from sticking. (I actually have a little tool for this job, but a spice jar is the perfect circumference for a marshmallow and works nicely also.)
  7. Once the dough balls have been pre-shaped with a little well in the center, place one on each of the graham crackers. Then place one marshmallow standing up in each well.
  8. Bake cookies on center rack of oven, one tray at a time. You will need to bake a total of four trays, but no need to bake all of these at once. You can save half of the cookie dough balls in the freezer for a later date. Or even just bake one tray, and save those cookie dough balls for another time. You get the idea.
  9. Bake cookies for about 11 minutes, or until the marshmallows have browned and melted, and the edges of the cookie dough are browning. The marshmallows will slop over to the side. It’s okay.
  10. As soon as you take the tray out of the oven, use a fork to scooch the marshmallow to the center of the cookie**, then press a chocolate square gently down into the center of the cookie. Be careful because the marshmallow will be hot! Repeat with all eight cookies. Let the cookies cool completely on the cookie sheet before transferring to a serving dish. Repeat with other tray(s) of cookies.
  11. In my opinion, these cookies are best if allowed to cool for at least an hour before eating. And they are still really good the next day, if there are any left.

Notes:

* For best results, use the brands I have mentioned. I haven’t tried other brands, so I don’t know how they will perform.

** Jill had the idea of using the chocolate square to scooch the marshmallow back to the center of the cookie before pressing it into the center. Try it!

*** I have to mention that I was at a school concert a couple of weeks ago, and I brought my molasses cookies for the bake sale. My friends absolutely love my molasses cookies, but I realized that they were not really flashy enough to get a lot of attention at the bake sale. They were being overshadowed by cookies with pink frosting, huge brownies, and giant cupcakes. You just know that next time I’m bringing these s’more cookies. Gotta raise money for the school orchestra! I’ll let you know if they go quickly.

And now more pictures, just because.

You can use a spice jar if you don’t have a tool like this one.

Nine can fit, but I think eight works a bit better. So cute!

Don’t panic!

Scooch the chocolate back to the center with a fork or the chocolate square!

I like how you can still see the word “Hershey’s”, even after the chocolate has gotten melty. Adorable!

And they make surprisingly nice gifts! You will make new friends for sure.

And even though I said these cookies aren’t photogenic, I think they are very pretty.

Posted in Cookies, Fun in the kitchen! | 8 Comments

Sourdough Pizza

Mara’s mushroom pizza.

I know it’s time to blog about a recipe when, week after week, I keep referring to a sloppily jotted down recipe on a piece of scrap paper, feeling nervous that I might lose it…

I’m sentimental about this piece of paper, so I’m keeping it!

Friday night is pizza/movie night at our house, and I’ve been making yeasted pizza dough from scratch for quite a while now. About a month ago, I knew I would be too busy to deal with pizza dough at 4pm like I normally do, so I decided to try my hand at sourdough pizza dough. I mean, how hard could it be? If you can make a loaf of sourdough bread, you can certainly make sourdough pizza dough. Right?

Ripe starter is a must!

I simply tweaked my favorite pizza dough recipe, kind of winging it by removing the yeast and replacing with sourdough starter, and tweaking some measurements a bit, and I was thrilled with the results! Why, you may ask, would sourdough be easier than a yeasted dough? Well, it’s about timing. I was going to be busy all afternoon, which is normally when I would be making that yeast dough. With sourdough, I put the dough together first thing in the morning (I do have to feed my starter the night before, but that’s quick and easy), and after a few stretch and folds, which are optional, I don’t have to look at the dough again until about 6pm or later, at which time I divide and shape the dough into balls for individual pizzas, or just two balls for two large pizzas. Then let the dough rest for about an hour while I preheat the oven/pizza stone and get my toppings ready.

Sourdough pizza dough with Italian herbs.

And here’s a nice benefit of this sourdough pizza dough – it is incredibly easy to shape! You pick it up and it stretches seamlessly in your hands! I’m not sure why that is, and I’m not going to question it. I’m just going to enjoy the beauty of it.

Let gravity do the work.

And the flavor? So very good!

Millie’s cheese pizza.

One thing I like is to have all of the ingredients very simple. I like to enjoy the flavor of each ingredient, so I don’t want anything to overpower anything else. For pizza sauce, I use tomato paste, then add just enough tomato sauce to the paste to get a spreadable texture. That way the sauce is not at all watery… wet pizza sauce makes for a soggy crust!

This is all you need!

And the toppings for the pizza should be sparing… you don’t want to weigh down your crust. For a light and airy, crispy crust, you’ll want just a thin layer of sauce, thin layer of shredded mozzarella, and a sprinkling of your favorite toppings. Don’t overdo it!  Matthew likes pepperoni and green bell pepper, Mara likes mushrooms, I like mushrooms and feta, with the occasional black olive or two, and Millie likes straight cheese. What are your favorite toppings?

Matthew’s pepperoni pizza.

Sourdough Pizza

(Makes 4 individual pizzas, or 2 large pizzas*)

For the dough:

  • 320 grams room temperature water (filtered if possible)
  • 100 grams active, bubbly starter
  • 2 hearty tablespoons (30 grams) extra virgin olive oil
  • 1 teaspoon granulated sugar
  • 490 grams bread flour**
  • 2 teaspoons (12 grams) kosher salt
  • 1 hearty tablespoon Italian herbs

For the sauce:

  • 1 6 ounce can tomato paste
  • ~1/2 can (15 ounce can) tomato sauce

For the toppings:

  • 4 cups shredded mozzarella cheese
  • Diced or thinly sliced veggies such as mushrooms, bell peppers, etc
  • Cooked sausage or pepperoni
  • Anything else you like!
  1. The night before you plan on making your pizza dough, feed your starter and leave on the counter overnight. You will want to end up with 100 grams of bubbly active starter for your recipe. I usually will take about 40 grams of starter, and feed it 60 grams of water and 60 grams of all-purpose flour. I add a teaspoon of rye flour to jazz things up.
  2. First thing in the morning (this is flexible!), mix your dough. Put 320 grams room temperature water into a medium mixing bowl. Add 100 grams active bubbly starter (put any leftover starter in your fridge), 2 hearty tablespoons (30 grams) olive oil, and 1 teaspoon granulated sugar to the water. Stir together with a fork (or I use a Danish dough whisk) until the starter is well incorporated and everything looks milky.
  3. Add 490 grams bread flour, 2 teaspoons (12 grams) kosher salt, and 1 heaping tablespoon Italian herbs. Mix well with large fork or dough whisk until everything comes together and you no longer see any dry flour. Dough will be shaggy.
  4. Cover and let dough rest for 30 minutes to an hour or so.
  5. After the dough has rested, scrape down the sides of the bowl all the way down to the bottom with a flexible bowl scraper or spatula. Then, using a slightly wet hand (I keep a bowl of water handy), grab the dough from the side of the bowl and press it into the center. Rotate the bowl and continue to grab and press until you’ve gone around a couple of times. This should take maybe about a minute. The dough will become more elastic and springy rather quickly. Try to incorporate any chunky bits until the dough looks smooth. Flip the dough over in the bowl (smooth side up), cover the bowl with plastic wrap or similar covering, and leave on your counter.
  6. After thirty minutes to an hour, once more scrape all along the side and bottom of the bowl with a wet spatula to make sure the dough isn’t sticking. With wet hands, scoop up the dough from the middle, letting the dough hang and stretch. Gently release the dough into a pile and rotate the bowl one quarter turn. Repeat, scooping up the dough and letting it hang and stretch. I sometimes jiggle it to encourage it to stretch a bit more. then cover the bowl and leave on the counter. These are called coil folds, and they will help develop the gluten in the dough, giving your dough a nice structure. Leave the dough in the covered bowl on your kitchen counter. You can come back and do another set of folds in about an hour if you like. Then leave the dough covered for anywhere from six to eight hours, or until it has almost doubled in size (don’t worry about the exactness of this… it’s pizza dough!), and has a bubble or two on the top.
  7. About one hour before you would like to be baking your pizzas, lightly flour your counter and scrape the dough out, sticky messy side facing up. Cut into four pieces for individual pizzas, or two pieces for two larger pizzas with a sharp knife or bench scraper (I like to weigh the pieces of dough so that the pizzas are all the same size, but that’s just me).
  8. With the sticky side still facing up, pull the sides of the dough pieces into the center and pinch together, making a little sack. Turn seam side down and roll into a ball with a cupped hand, tightening the shape. You will need to sweep off any flour that is on the counter surface in order for this to work. Here is a great video from King Arthur Baking Company that shows how to do this: How to shape dough into balls.
  9. Place the rolls seam side down on a greased or parchment lined baking sheet, equally spaced. Cover with tea towel or upside down baking sheet and let rest for an hour. At this time, place one oven rack on the lower third of your oven, and one oven rack on the upper third. Place a pizza stone or other such baking stone on the bottom rack. Preheat your oven to 550°F.
  10. While oven is preheating, you can prepare your sauce and toppings. Of course, you can use any kind of pizza sauce you like, but here’s how I do mine, which is very simple: In a small bowl, mix together one 6 oz can of tomato paste with 1/4 cup tomato sauce. It will still be pasty. Now add more tomato sauce little by little until you get a spreadable consistency. The sauce needs to be saucy enough to not tear your dough when spreading it, but not so wet that it makes your pizza soggy. Taste it; if it is too acidic for you, add a dash of sugar. Set aside.
  11. Prepare your pizza toppings. Whatever you choose, you want nice thin slices or small diced veggies. After chopping or slicing your toppings, if any are juicy, such as bell peppers or tomato slices, press them between layers of paper towels to remove some of the moisture so they don’t make the pizza soggy.
  12. Time to prepare your pizza dough! Just a heads up: unlike yeast dough, your sourdough pizza dough balls will have spread out and look flatish. Don’t worry! Here’s what you do. Place a square of parchment paper on a rimless baking sheet or pizza peel. With floured hands, pick up one of the dough balls. You may have to gently scrape it off the parchment with a bench scraper. Rotating the dough in your hands, it should start to stretch out. Keep rotating the dough, holding onto the edges. You can drape the dough over the tops of your hands to gently gently stretch it a bit more, keeping it round in shape. Now place the dough onto the prepared baking sheet, reshaping a bit as necessary to make it round. Dimple the dough with floured fingers to prevent any large bubbles from occurring during baking.
  13. Spread a thin layer of sauce over your dough. I like to take the sauce all the way to the edges. Sprinkle with mozzarella (you should still be able to see the sauce… go easy on the cheese!), then add your toppings sparingly. A bogged down pizza will be soggy and will not bake through. Repeat with all of the pizza dough, or have your minions do it at the same time you are making yours. I store any leftover sauce in the freezer and use it the following week. Leftover toppings can be used for omelets or stir-fries. Don’t throw anything away!
  14. Now that your pizza is ready to go in the oven, cut the parchment paper around the edge of the pizza, leaving a “tab” (there will be a picture tutorial at the end of these instructions if this sounds confusing). Open your oven, which should be good and hot, and slide the pizza, parchment and all, onto the hot baking stone, with the tab facing you. Close and let pizza bake for about three minutes. Open oven and gently lift the edge of the pizza with a fork, and if the pizza bottom looks like it needs more time, let bake for another minute. At this point, you can remove the parchment by yanking on the tab. I yank it out with my fingers because the parchment isn’t hot to the touch. I lift the tab with the fork, grab tab, then hold the pizza edge with fork while I yank out the parchment so the pizza doesn’t come with it, but you can skip that part if you don’t feel confident. I usually end up baking the pizza on the stone for a total of four minutes, but it varies. The first pizza always bakes faster, by the way. Now, using the rimless baking sheet, slide the pizza onto the sheet using a fork, and transfer the pizza to the top rack without the parchment paper, which you will remove and discard if you haven’t done so already, and let it bake for two more minutes, or until it looks done to you. The top will get a bit charred. If you don’t like the top of your pizza charred, keep an eye on it. (What I love is when it gets a bit charred, and the edges that have that tomato sauce char and are so delicious!) Remove pizza and place on cooling rack. Now repeat with all the other pizzas. Each pizza take about 6 minutes to bake (4 minutes on bottom rack and 2 minutes on top rack), so the whole baking operation should take about half an hour, give or take a few. If you would like to streamline the process a bit, you can put the second pizza in at the same time that you move the first pizza to the top rack, but this takes a bit of practice, and I wouldn’t recommend it unless you are feeling super confident. Burning one of your precious pizzas is really really sad and disappointing.
  15. Now that all of your pizzas are baked, they are at differing levels of hot. At this point, I turn the oven off, but it’s still super hot in there, and I  will toss in the first pizza onto the pizza stone for thirty seconds just before slicing it. Same with the other pizzas as necessary. Can you believe we do this over here every Friday night???? The whole process may seem a bit overwhelming, but it’s fun when everyone helps making their own pizzas, and it does get easier with a bit of practice. And the sourdough pizza crust is so so very good!!!

Notes:

* The size for the individual pizza (when making four) is approximately 9″, and the size for the large pizza (when making two) is approximately 12″. There is a total of about 960 grams of dough, so you can divide it any way you like. I have divided it into 5 individual pizzas and they were still a good size! The shaping of the larger ones can be a bit unwieldy, so although it’s more work, I still prefer to make the individual pizzas.

** I’ve been using Cairnspring Mills Organic Expresso Bread Flour. It is amazing. Cairnspring Mills is a local mill a little over an hour drive north of Seattle, in Burlington. They use grains from local farmers for their flour. If you have anything like this near you, I highly recommend it for flavor that just cannot be beat, and you’ll feel so happy knowing where your flour is coming from. I also love King Arthur flours, which are always consistently good.

And now, here is a picture tutorial:

Feed your starter the night before!

Happy active starter the next morning.

Put water, starter, oil, and sugar in medium bowl.

Mix until milky and starter is well incorporated.

Add flour, salt, and Italian herbs.

Mix well; dough will be shaggy.

Cover and let dough rest for 30 minutes to an hour.

Loosen edges of dough with flexible bowl scraper.

Using wet hand, pull dough from side and press into middle.

Rotate bowl and continue pulling and pressing dough to center.

After about a minute, dough looks like this.

Flip dough over so it is “smooth side up”.

Cover and let rest for about 30 minutes to an hour.

Dough might now look like this.

Coil fold! Pick up dough from center with wet hands, and let it stretch. Release onto itself, rotate bowl, and repeat a couple of times.

Cover and let rest for 6 to 8 hours, or until dough has almost doubled in size.

Now dough might look like this. You can see some bubbles, and dough is soft to the touch.

Scrape dough out onto lightly floured surface.

Cut dough into four equal pieces.

Pull edges of dough up and pinch at top.

Flip dough over and cup with your hand, gently rotating dough to create tension.

Place dough balls on lightly floured parchment lined baking sheet.

Cover and let rest for an hour or so.

While dough is resting, place racks on bottom and top thirds of oven and get your pizza stone in there. Preheat oven to 550°.

Make sauce.

Prepare toppings.

After about an hour or so, the dough will have spread out.

Time to shape dough! Pick it up and rotate by the edges to let it stretch.
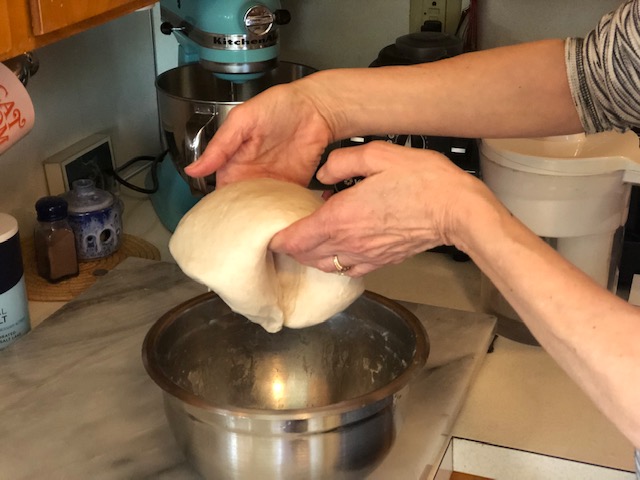
Gently let it drape over hands to stretch it more.

Place on prepared baking sheet and shape a bit more if necessary.

Dimple dough with fingers, then add sauce and cheese; we are getting close!
Add toppings… not too many!

Cut parchment and leave a tab.

In the oven! Sorry for the terrible photo…

First pizza is now on the top rack. Second pizza is on bottom rack, but you don’t have to do two at a time.

Pizza is done!!

This one is mine: lots of char!

And in homage to St. Louis style pizza, I always cut mine into squares :). Enjoy!

Posted in Fun in the kitchen!, Sourdough | 5 Comments

The Perfect Vintage Cake Platter

I want to talk about cake platters. For years, I have struggled when trying to find a good plate for presenting a birthday cake. Ordinary dinner plates are often not quite wide enough, and more irksome, they have raised edges, making slicing the cake a bit difficult!

Cute plate, but has raised edges!

Then one day, someone was giving away an old glass plate on my Buy Nothing group. I can’t remember what he called it… perhaps a trivet? He didn’t know that it was a cake platter, and I didn’t know it either, but I was curious, and I was the lucky recipient.

Look at the sweet sunflower design!

This unusual plate had three small “feet” on the bottom…

A mystery!

And it was not only flat, the plate itself slanted slightly downward!

Notice the slight slant!

After much discussion with friends and family about this plate, we all agreed that it was indeed a cake platter! The ever-so-slight downward slant makes it easy to slice and serve your cake without ruining the often decorated frosting edge. And the three feet on the bottom lift the platter just enough to make it easy to pick up; imagine trying to pick it up if it were flush to the table.

I just found this one at Goodwill yesterday. So cute!

I’m trying not to obsess too much over these ingenious creations, but seriously, who invented them? I guess I need to do some research. It seems to me that these plates were very well thought out, at a time when most birthday cakes were made by somebody’s mom, and presented at a family celebration. This makes these platters even more special to me. How many birthdays and celebrations have these platters already seen? Certainly much love was put into making beautiful cakes and serving them on beautiful platters. And I am happy to give these platters a new life, with many celebrations to come.

Even my cake dome works well with this platter!

I just recently made my first attempt at making a split lemon cake, which was my Dad’s favorite, and beloved by so many of us who have grown up in St. Louis. When I remembered my special cake platter, I knew it was the perfect way to display and present my creation! For the unveiling, I invited some friends over for tea, which is the perfect thing to do when you make a cake just because.

My latest tea party.

So, back to these lovely cake platters! I often see them at Goodwill; a good washing will have them gorgeous and sparkly and ready to show off your cakes. Go get one for yourself, and then let me know just how much you love it. And then bake a cake for someone you love.

Posted in Desserts, Musings | 8 Comments

Lemon Curd

I can’t remember why I first made lemon curd, but I do remember being surprised at how easy it is to make, and how delicious it is. Millie and I made a Victoria Sponge Cake filled with lemon curd and whipped cream; we were inspired by The Great British Baking Show. Maybe that was the first time I made lemon curd?

This is one very fancy sandwich!

You can also bake up a short crust and whip up a lemon curd tart – easy and delicious!

Extra fancy!

But really, you will probably just want to eat it straight out of the jar with a spoon. This is what my mother-in-law Barb likes to do. I’m totally blabbing her secret, but she won’t mind. It is just that good. Or you can spread it on scones or flaky buttermilk biscuits. We almost do this weekly with Barb! And the best part is that it’s quick to make, and pretty easy. You don’t need a lot of ingredients… just two to three lemons, sugar, eggs, butter…

Barb snuggling with our cat Togy on a chilly February day.

I tried a couple of different recipes, to find that most were way too sweet for me until I found this one from Epicurious. This is the one; really lemony and tangy. One time I made it with Meyer lemons, and I was disappointed because the curd didn’t have the same zip to it. So yes, I like my curd very tart! And if you do too, you will love this recipe.

Lemon Curd

(from Epicurious)

  • 1/2 cup fresh lemon juice (from two to three lemons)
  • 1/2 cup granulated sugar
  • 3 large eggs*
  • 2 teaspoons finely grated lemon zest (use a microplane grater)
  • 6 Tablespoons unsalted butter, softened and cut into pats
  1. Wash the lemons and dry well. Using a microplane grater, grate the lemon zest into a small bowl until you have 2 teaspoons worth; set aside.
  2. Juice the lemons until you have 1/2 cup of juice. Strain the juice and pour into a heavy 2-quart saucepan.
  3. Add the sugar, eggs, and lemon zest to the juice and cook over a medium-low heat, whisking constantly while adding the butter pieces a little bit at a time.
  4. Continue to whisk and heat the curd until the curd holds the line of the whisk, and you see the first bubble or two of a simmer appear at the top. The curd should reach 170°F. This can take up to twenty minutes! Don’t rush the process by turning up the heat, otherwise you might end up with scrambled eggs.
  5. Remove from heat and transfer to a small bowl, covering the top of the curd with plastic wrap… yes, the wrap should be touching the curd. It keeps the curd from developing a skin. Let cool completely and store in an airtight container in the refrigerator.

Notes:

*I recommend removing the little white stringy things (chalaza) that are attached to the egg yolks before using the eggs. The chalaza, once cooked, will look like white lumps in your lemon zest. No thank you. On that note, some like to strain the curd after it is made, but I do not. Too much work! Plus, I like the teeny bits of zest, but if you prefer, go ahead and strain it. Also, the microplane zester zests so finely that you can hardly tell that there are bits of zest in the curd, but you do get all of the flavor.

All the necessary ingredients, plus my favorite flexible whisk.

Just zest the rind, not the white pith, which can be bitter.

Oops! I put all the butter in at once, but it still came out fine!

Butter melting.

This flexible whisk bends, allowing it to get into the cornery edges of the pan.

End product will be a bit gelatinous and will leave trails. It thickens quite a bit once chilled.

Enjoy!

And just for fun:

The girls, me, and Barb at Mount Rainier, October 2022.

Posted in Desserts, Fun in the kitchen! | 3 Comments

Millie’s Swiss Roll

My daughter Millie made this amazing Swiss Roll a few days ago. She knew I was going out, and she was happy to have the kitchen all to herself for a fun baking project.

I was gone all day at the 5th Avenue Theater with my friend Sheryl; she invited me to The Sound of Music “sing along” for my birthday. It was kind of like seeing The Rocky Horror Picture Show, except for older folks, haha. There was swag, and at the beginning they had a costume contest, and then they coached us on things to say and do during the movie. There were, of course, those that took the liberty of coming up with their own hysterical things to shout at the screen.

Swag for audience participation

When I got home, Millie was still working on her Swiss Roll. She had tried to make a substitution for whipping cream with milk and butter, which did NOT work, so Matthew and Mara ran off to the grocery store to get the real thing. Millie took it all in stride. In the end, her Swiss Roll was amazing. She used the recipe from Preppy Kitchen. The chocolate sponge was tender and flavorful, the whipped cream had just the right hint of sweetness, and the chocolate ganache added the perfect pop of intense chocolate flavor, as well as a beautiful sheen.

The perfect roll, worthy of a Paul Hollywood handshake

I’m sure if I tried to make it, I would have been a nervous wreck. Millie says I worry too much about these kinds of things, and she’s probably right. The only time I ever attempted to make a rolled cake (Bûche de Noël), was back when I was in college, and I made the dessert for a Christmas celebration with family and friends. The cake cracked, making it difficult to spread the chocolate mousse filling, and impossible to roll. It wasn’t pretty, but it didn’t stop me, and everyone loved it. So fast forward to this evening, speaking of things not going well.

My favorite split pea soup, mid process

I was making split pea soup for dinner. It had been a long day. I was tired and hungry. This split pea soup recipe is absolutely one of my favorites, and I was looking forward to having it for dinner. The finishing touch is taking an immersion blender (I love my immersion blender) and blending the simmering peas and sauteed veggies into a velvety purée. So good. So I took my immersion blender and got it going, when suddenly it made a horrible noise. And I noticed something big and gray floating in the soup. I had forgotten to remove the safety guard from the blade end of the blender, and part of it got shredded into the soup! Millie ran into the kitchen to see what all the commotion and noise was; I was practically in tears. She helped me fish out pieces of plastic from the soup. I was so disheartened, and felt way too tired to put a Plan B into action. And here’s the craziest part: Matthew and I ate the soup. Don’t judge us. I watched in disbelief as Matthew picked out a few little pieces of shredded plastic that Millie and I had missed. It reminded me of a story Matthew told at a dinner party, way back in the days before we were dating.

Our first date was a hike to the top of Mount Si.

The story went something like this: His grandmother made biscuits for his grandfather, back when they were newlyweds, and the biscuits came out so hard that the two of them went outside and threw them at the passing-by train cars, laughing all the while. I will never forget hearing Matthew tell this story, and if you know Matthew, you will know that he told it much more eloquently and with many more interesting details than I just did. Hearing him tell that story, something touched my heart, and that was when I started falling in love with him. Tonight, we both laughed at the shredded plastic soup fiasco, and I told him that it would be a story to rival the old one of his grandparents and the tough biscuits. We laughed again. And then to put everything right, we sat down and had a piece of Millie’s Amazing Swiss Roll.

Posted in Desserts, Musings | 12 Comments

Potato Kale Soup (Soupe de Legumes)

I brought home some kale the other day. I was planning on either making a kale salad, or maybe sauteed kale for a side dish. But somehow I got the craving for soup instead, so I looked up “potato kale soup”, and found this recipe from Pinch of Yum. It seemed easy and pretty quick to make, so I got started.

Simple and comforting.

I decided to skip the milk altogether, and also decided to use my handy immersion blender instead of transferring the soup to a blender… way too much work. Once I got the soup to the puréed stage, it was just so so good! It reminded me of a summer I spent in France. I was staying with a French family, and the mother loved to make soupe de legumes for a simple supper. She would serve it with crusty bread, and put a little pitcher of milk on the table in case anyone wanted to add it to their soup.

Leftovers can be reheated with a little more broth.

There have been a couple of times over the years that I have accidentally made a soup like this, so I decided I better write it down. The thing is, if you don’t like kale, you can use carrots instead (start sautéing when you sauté the potatoes), or some other veggies, but keep it simple. Potatoes and onions are always the base. I think this soup is absolutely dreamy and delicious. Maybe it’s because it’s linked to a food memory? Or maybe it’s just really good. You decide.

Potato Kale Soup

(Adapted from Pinch of Yum’s recipe)

  • 5 tablespoons unsalted butter
  • 1 medium yellow onion, chopped
  • 3 medium russet potatoes, peeled and chopped into 1 inch chunks
  • 6 cups chicken or vegetable broth (homemade if possible)
  • 3 cups chopped kale, stems removed
  • salt and pepper to taste
  • 2 cups milk, heated (optional)
  1. In a large soup pot or dutch oven, melt the butter on medium heat.
  2. Sauté the onions until translucent, about ten minutes.
  3. Add the potatoes and sauté for ten to fifteen minutes, or until the potatoes begin to brown.
  4. Add 4 cups of broth and the chopped kale, and simmer until the potatoes are tender, about ten minutes more.
  5. Blend soup in the pot with an immersion blender until the soup is smooth. Now add in the remaining two cups of broth and bring back to a simmer. Add salt and pepper to taste.
  6. Serve with a good crusty bread and offer extra cracked pepper, and if you like, have a pitcher of heated milk on the table for stirring into the soup. Enjoy!

Posted in Comfort Food, Soups | 2 Comments

Berliner Brot

As we head into the holiday season, I start to think about all the different special holiday cookies I like to make. This year I have a new addition; Berliner Brot! These chewy cookies are unlike American treats; they are fragrant with candied citrus peel, allspice and cinnamon, toasted almonds, and shaved dark chocolate, and have a lovely rum glaze!

I learned about this cookie from my friend Ruth. She and I met during the early days of the Covid lockdown. We are both in our neighborhood Buy Nothing group, and we began to give things to each other. I actually just looked back on our history, and it was back in 2017! I gave Ruth a set of dishes, and then later she gave me a set of beautiful beaded napkin rings, which we use every Thanksgiving.

Ruth’s napkin rings

But we didn’t meet in person until Covid. It was at that point that we started giving each other all sorts of things, and found out we had a lot of common interests, including gardening, knitting, and…. baking!!! Ruth was a new mom in 2020. Here is a photo of her reading to her sweet baby boy a Dr. Seuss book that we gave to her.

Ruth with Rhys

On one of our exchanges during Christmas 2020, Ruth included a little bag of cookies. At first bite I became thoroughly obsessed! I grilled her with questions, only to find out that one of the ingredients her mother mailed to her from Germany! I have never forgotten how wonderful those cookies were, and have been wanting to recreate them ever since.

They are fun to make, and lovely to give during the holidays.

Just recently, Ruth gave me the recipe, which was in German haha… Millie and I tried to figure it all out, which was a challenge! There were also some ingredients that I didn’t think I could find here. Luckily another friend of mine was going to Germany and asked if she could bring anything back for me. Well, yes! She brought me back some candied citrus peel, and that’s all I needed to get started!

Orangeat and Zitronat… the real deal!

I know you can find candied citrus peel here, but Ruth said it wasn’t the same, and I believe her. So back to the recipe. I felt a little intimidated by it being in German, so I did some research, and found a recipe for Berliner Brot online that was in English, and basically had the same ingredient list as Ruth’s. Bingo! I made it a couple of times following the new recipe which had less sugar. Of course I had to drop some off to Ruth so she could try them. She thought they were a little dry (due to less sugar, and maybe over-baking?), and I agreed. So I used a combination of Ruth’s recipe and the new one, baked for less time, and I love the results! Maybe these will become part of your holiday cookie list too.

Berliner Brot

(Adapted from Ruth’s recipe and this one!)

Makes about 6 dozen

  • 1 cup raw almonds
  • 2 large eggs
  • 2 tablespoons warm water
  • 1 1/4 cup (250 grams) dark brown sugar
  • 1/4 cup (70 grams) maple syrup
  • 1 tablespoon dark rum
  • 1/8 teaspoon allspice
  • 1 tablespoon cinnamon
  • 2 cups (250 grams) all-purpose flour
  • 3/4 teaspoon baking powder
  • 1/4 cup (50 grams) candied lemon or orange peel*
  • 1/2 cup plus 2 tablespoons (75 grams) chopped/shaved dark chocolate**
  • Butter or margarine for greasing the pan

For the glaze:

  • 1 cup (100 grams) powdered sugar
  • 1 teaspoon dark rum
  • 2 tablespoons water (you may not need all of it)
  1. Preheat oven to 350°. Place almonds on cookie sheet and bake in 350° oven for ten minutes. Remove and let cool.
  2. While the almonds are baking, chop the chocolate with a sharp knife and set aside. When I do this, most of it ends up being shaved pieces, but there are also some bigger pieces. It’s nice that way!
  3. Increase oven temperature to 400°.
  4. In a large bowl, using an electric mixer, beat eggs with the warm water, then add the brown sugar little by little. Beat until light in color and nice and thick.
  5. Beat in the maple syrup and dark rum.
  6. In a medium bowl, whisk together the flour, baking powder, cinnamon and allspice.
  7. Add the flour mixture to the wet ingredients and mix on low speed just until blended.
  8. Roughly chop the cooled almonds. Stir in the chopped almonds, chocolate, and candied peel, using a wooden spoon.
  9. Butter a large (13″ x 18″) cookie sheet. If you use something like Earth Balance to grease the sheet, these cookies are completely dairy-free.
  10. Take a sheet of aluminum foil that is a little longer than the width of the cookie sheet, and fold until you have a one inch strip. Butter the foil strip. Stay with me here.
  11. Pour the cookie batter (it will be thick!) onto the cookie sheet, and spread it to a 1/2″ thickness. You will not fill your cookie sheet completely. For me, it ends up being about 13″ x 11″. Take the buttered foil strip and press it against the edge of the batter to keep it from spreading. (see photos!)
  12. Bake on center rack of preheated 400° oven for 20 minutes.
  13. While cookies are baking, make the glaze. Mix together the powdered sugar, rum, and 1 tablespoon water. If it’s too thick, continue to add water a few drops at a time until it is a glaze consistency, thick and glossy.
  14. When cookies are done baking (they will be firm to the touch), remove from oven and glaze while still hot. Let cookies cool a little bit, then cut into 1 1/2″ squares while still warm, using a sharp knife. Let the cookies continue to cool on the cookie sheet. When completely cool, you can store in an airtight container, or if you would like them a little dryer, you can separate the cookies and leave on the cookie sheet a little longer to dry out, and then store them in an airtight container. If you find that the cookies seem too moist (i.e. sticky on the bottom), you can put them back in a 350° oven for ten more minutes. They might even get crunchy on the edges while still remaining chewy inside. It all depends on how you like them. These cookies get better with age, which I appreciate in a holiday cookie***. Enjoy!

Notes:

*Of course I used up my German candied peel during my practice batches, so I ended up using some candied orange peel that I got at a fancy grocery store, and in the absence of the real deal, this works just fine.

**I use Trader Joe’s dark chocolate bar, and 6 little squares end up being about 75 grams. See pictures! And don’t even think about using chocolate chips. They don’t behave the same way in baked good as shaved or chopped chocolate.

***Like many spiced holiday cookies, these really benefit from a day or two or three of rest to let the flavors mingle and the texture settle down a bit. They are perfect for gift giving or sending in the mail, because they just keep getting better!

****If you want to side-step the whole aluminum foil thing, just make a batch and a half of the recipe, and that fits nicely into a standard cookie sheet (13″ x 18″). Or, you could halve the recipe and use an 8″ x 8″ pan.

Here are a few pictures of the process that might be helpful. I might add more pictures later, so check back in.

Go get a dark chocolate bar.

Mostly shaved, with some slightly bigger pieces.

Roughly chopped almonds.

Orangeat and Zitronat

Eggs, water, and dark brown sugar. Not mixed enough!!!

Now it’s mixed enough.

Smooth and glossy after adding maple syrup and rum.

Sprinkle add-ins on top and fold in.

Spread on buttered cookie sheet.

You’re looking for about a 1/2 inch thickness.

Press buttered foil up against edge of batter.

This looks done!

Glazed and cut, and sampled, apparently…

Separated on cookie sheet too dry a bit.

Store in a tupperware container.

Or store in an airtight jar. They look so pretty!

This is a batch and a half – it fits the cookie sheet perfectly!

Posted in Cookies, Dairy-free, Fun in the kitchen! | Leave a comment

Oven Roasted Cauliflower

I was tempted to call this post: Things My Family Doesn’t Like, but then that wouldn’t be very descriptive, would it? I just got back from St. Louis. My daughters and I went there to spend some special time with my sister Linda’s kids. Linda passed away in May, and although we all went to St. Louis in June for services, we really wanted to go back.

Here we are, together again.

I cherish every moment we spent together, and am so grateful. When I got back to Seattle, I was hit by a fresh wave of grief. I am not surprised. How could I spend such wonderful time with Linda’s kids, her living legacy, and not just miss her all the more? So I needed to take extra good care of myself. Get good rest, drink plenty of water, and eat well. I did a grocery run and picked up a head of cauliflower… something my family does not like! But this is about self care.

Oven Roasted Cauliflower – so good!

I’ve made oven roasted cauliflower before, but this time I paid more attention. I got the recipe from the  allrecipes website. I followed the baking instructions, but changed the seasoning. Remember, this is things my family doesn’t like, right? So I tossed the cauliflower florets in olive oil, added a big pinch of salt, freshly cracked black pepper, and a bunch of dashes of Chinese Five Spice – so dreamy!! But my family can detect that spice mix from a mile away, and they don’t approve. Or at least the girls don’t. But this is for me! Chinese Five Spice is a blend of star anise, cloves, Chinese cinnamon, Sichuan pepper, and fennel. It gives everything an amazing, exotic flavor that I adore.

Look at that crispy golden brown caramelization!

Of course you can use any seasoning you like, but since it will just be me eating this cauliflower, I’m going for the Five Spice!

Oven Roasted Cauliflower

  • 1 head cauliflower, cut into 1 1/2″ florets
  • 1/4 cup olive oil or avocado oil
  • Goodly pinch kosher salt
  • 1/2 teaspoon fresh cracked pepper
  • Couple dashes (1/2 teaspoon?) Chinese Five Spice
  1. Preheat oven to 450°
  2. In a large bowl, toss cauliflower florets with olive oil. Sprinkle with salt, pepper, and Chinese Five Spice. Toss well.
  3. Spread cauliflower evenly on a cookie sheet. Make sure the pieces are spread apart for better roasting. If the pieces are too close together, they will steam.
  4. Bake on center rack of preheated 450° oven for 15 minutes. Using two spoons or a spatula, toss the pieces of cauliflower around to flip them over. Bake for ten more minutes.
  5. Serve and enjoy! Leftovers can be stored in the fridge, and are delicious hot or cold.

Posted in Side Dishes | 2 Comments

All Things Pie

I am getting ready to teach some pie crust workshops in my home… In a lot of ways I’ve been preparing for this for years. Always in the back of my mind I imagine sharing the joy of making a flaky, delicious, all-butter pie crust with everyone I know. I have slowly been collecting equipment.

Getting the table ready!

I’ve been reflecting (read: obsessing) on all the details, and it occurs to me that it might be a good idea to write about my favorite kitchen tools for pie making. So here it goes.

4 quart Pyrex glass bowl (11 3/4″ across the top)

I love this 4 quart Pyrex bowl for mixing pie dough. It is large and shallow; easy to get my hands into. I throw it in the freezer about ten minutes before I want to make my dough; the glass stays cold the entire time I am working, keeping the butter from melting. I can always find one of these at Goodwill.

High quality stainless steel measuring cups and spoons

Maybe I’m spoiled, but I love these measuring cups and spoons. They were given to us as a house warming gift, and they come from Williams-Sonoma. I use them every day for one thing or another, and I love the way they feel in my hand.

KitchenAid pastry blender

I love this KitchenAid pastry blender. The handle is easy on my hands (important!), and I like the red color. I have many pastry blenders (for the workshops!), but my favorite is the KitchenAid. Find one with a soft handle!

Williams-Sonoma spatula

This may seem obvious, but having a good favorite spatula is important! Here’s that red again – so pretty! I also like the wooden handle. I’ve had this one for so long now that the handle is warped, but it’s still the first one I reach for.

OXO brand sifter

I use this sifter all the time for pie and bread making. It makes a nice dusting of flour when I need it. It is always on my counter at the ready. If you are in Seattle, you can get one of these at Cookin’ at Madison Park.

Plastic Wrap Dispenser

For the record, I really don’t like plastic wrap, but I still have to use it every now and then, and especially for wrapping discs of pie dough. In the past I have struggled and wrangled with the kind of plastic wrap you get at the grocery store, but never again. This awesome dispenser you can get at the King Arthur Baking website, along with refills for plastic wrap. It works like a charm. Because I am not wasting the wrap by tearing it in the wrong place, etc, I only use what I need, and no more swearing and gnashing of teeth.

My favorite rolling pin

This is my absolute favorite rolling pin. It is heavy duty, and the chrome handles have a….. wait for it….. RED accent stripe. This rolling pin is vintage and belonged to my mom. I love it. A good rolling pin is heavy, but not too heavy, and rolls smoothly and easily. Check your local thrift stores, but be patient. Don’t get a lightweight one. A good one is worth waiting for.

My other favorite rolling pin

This beautiful, versatile rolling pin is nice and long; perfect for rolling out larger doughs, while still being a good option for pie crust. I got this from Home Cake Decorating in Seattle. This store is a local gem, serving Seattle bakers since 1960. The new owner, Dave, is always there, ready to answer all of your baking questions. Don’t miss any opportunity to drop by and browse. I bet you won’t leave empty handed.

Bench scraper

It may seem strange for me to have a strong opinion about bench scrapers, but I do. This is my very favorite one, made by Progressive. I actually have two of these, since I use them so often. They are great for maneuvering pie dough, scooping up chopped fruit or veggies, and even doing clean up. The Progressive brand has a slightly sharp edge to it, making it my first choice for cubing cold butter. I got mine at our local Maple Leaf Ace Hardware in Seattle.

9″ USA Pan pie pan

Although I have a ridiculous number of pie pans, my 9″ USA Pan pie pans are the ones I prefer. The metal transfers heat quickly, making for a solid bake and crispy crust. If you prefer a decorative ceramic pie plate, you can always bake in the metal pie pan, and then once cooled, slide the pie into your decorative pie plate. You can get these from the King Arthur Baking catalog or website. Warning: deep dish pie plates, although pretty, really cause problems with baking pies. Stick with the shallow ones for best results.

Pastry cutter is behind, pizza wheel in front

If you are just wanting to trim away excess pie dough, a sharp pizza wheel works nicely. I got mine at a thrift shop. For doing more detailed work, or for a fancy fluted edge, you might want an actual pastry cutter. I got mine at Cookin’ at Madison Park. Actually, I should say that my husband and kids got it there; my Christmas wish list is usually all kitchen tools… surprise! In the absence of a pastry cutter, a sharp knife will do.

Pastry brushes – OXO silicone pastry brush in front, bristle brush behind

I never thought I would like a silicone pastry brush, but now I can’t live without one. I use it to brush cream or milk onto pastries and pies before baking, to brush egg wash on breads and rolls before they go into the oven, brush toast with olive oil before topping with other goodies…. and this brush goes in the dishwasher! So you might want to know what I use the bristle brush for? I use it to brush away excess flour from pie dough before it goes into the pie pan; for this job, only a bristle brush will do. I also have a second bristle brush that is reserved for seasoning my pizzelle iron :). I get the bristle brushes from the grocery store, and the OXO silicone brush came from the beloved Mrs. Cook’s that graced the University Village in Seattle for 42 years before closing their doors. I’m not sure where you can get these brushes now, but I would recommend the OXO brand.

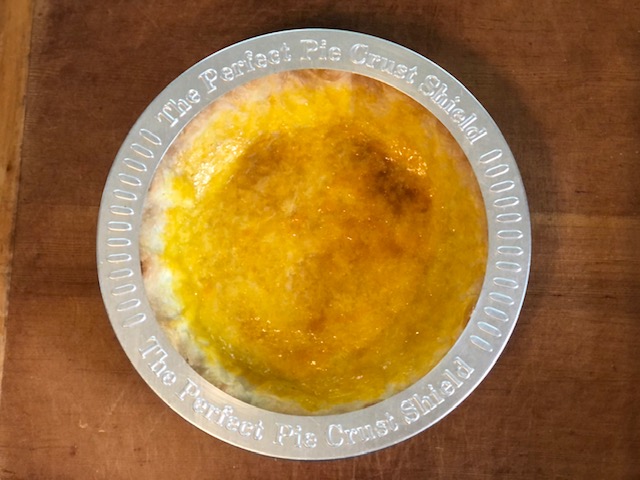
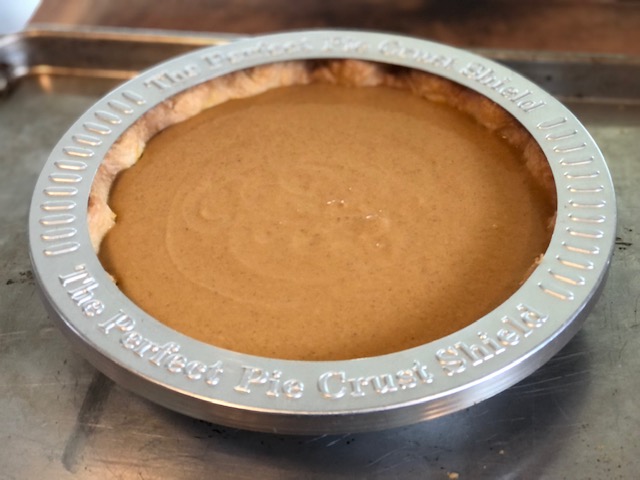
The picture says it all

I used to struggle to make the perfect little ring of foil to protect the edges of my pie crusts from burning. It was always so tricky to get the foil just right so that it fit properly, and also so that it didn’t touch the filling and get stuck. This pie crust shield is a life saver! I just plop it on the crust as soon as the edges are golden brown, and then let the pie finish baking. Perfection. Easy to clean and store. Pretty sure I’ve seen these at Home Cake Decorating as well as Cookin’ at Madison Park.

Oven thermometer!

I think everyone should have an oven thermometer. Mine lives permanently in my oven. All ovens are not created equal… some run hot, some run cold; why take any chances? Your masterpieces will bake up beautifully at the right temperature, so better safe than sorry. You can usually find these at the grocery store in the baking section. I got this particular one at a yard sale, and I’m rather obsessed with it, as it is easy to read, and hasn’t discolored like some others I have had. Apparently you can get this at Sur La Table.

Kitchen scale!

I never used to weigh my ingredients, but I also never had consistent results when it came to pie crust. Now I weigh my flour every time! My kitchen scale was given to me by my lovely neighbor Susy, and I cherish it. It hangs on my kitchen wall sometimes, but most of the time it is sitting on my kitchen counter because it gets used so often. If you don’t have a kitchen scale yet, I highly recommend it! You can get the flat, slim kind that stores easily in a kitchen drawer. Although I don’t have a specific one to recommend, I do suggest getting a good one (read all the reviews), because you don’t want to end up frustrated with a model that doesn’t work well. Mine is a Soehnle, and I know that they do still make kitchen scales, including the flat kind. Let me know if you have one that you love!

Citrus Juicer

And because I often use freshly squeezed lemon juice for my apple pies and galettes, among other things, I must recommend this stainless steel citrus juicer made by Endurance. I love that it has a strainer, that the top comes off for easy pouring, and that it goes in the dishwasher for easy cleaning. My glass one got chipped in my gadget drawer, so I had to replace it. I didn’t know I could love a juicer until I owned this one. I got it at Cookin’ at Madison Park.

How could I not mention my marble pastry board?

My marble pastry board has a permanent place of honor in the corner of my kitchen where I spend so much time. This is definitely a luxury; I did fine before I had it, but oh, how I love it. I use it for kneading, cutting, and shaping breads, and of course, for rolling out doughs of all kinds; pie dough, croissant dough, kouign amann dough, cinnamon roll dough… you name it. The marble stays cool, which is a huge bonus when rolling out any pastry dough, since you don’t want the butter to get warm. This one is 18″ x 18″, which is pretty much perfect for all of my kitchen projects. It has some dings and chips on the edges where things have knocked into it, but it is still my sturdy workhorse. This one came from Mrs. Cook’s, but you can most likely find them at fancier kitchen stores. Also, keep an eye out when you go thrifting. Like I said, this is a luxury, not a necessity, but it sure has made my pie life a whole lot easier.

If you are still reading at this point, wow. There were lots of things to write about. Hopefully most of these things are standard kitchen items, and I hope the list is helpful. Happy Pie Making!!!

Posted in Pie! | 4 Comments