I am sometimes tortured by always wanting to experiment with recipes. Not sure I really need another chocolate chip cookie recipe, but this isn’t so much about a recipe as it is about a baking method.

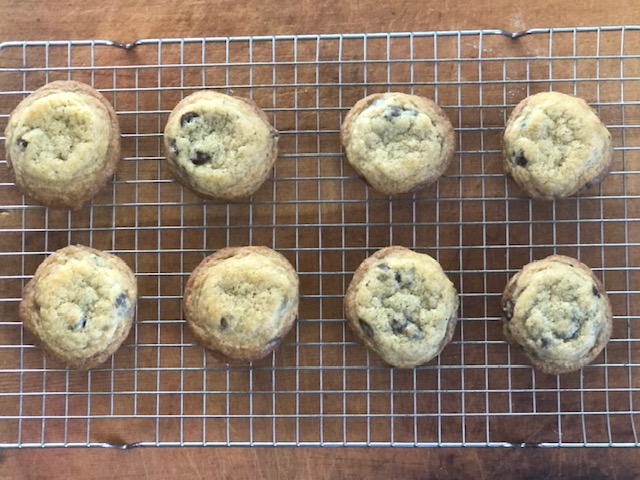
Bottoms are nice and crispy and evenly baked.
Warning: this cookie requires freezing the dough, so it is definitely a make ahead kind of cookie dough, that then turns into an I-need-a-cookie-now kind of cookie.
There is something that has recently happened a couple of times by mistake, and I realize that I kind of like the result of the mistake! Is it an extra couple of steps that are too much of a pain? Maybe. But if you want a cookie that is crispy but but not over-baked on the bottom and gooey-chewy in the center without being under-baked, and an even bake overall, stay with me.

This is what I’m after.
I often will make cookie dough and scoop it into cookie dough balls, which I freeze and keep for later. That way, whenever we feel like having freshly baked cookies, I grab a few out of the freezer and bake them up. Sometimes, because they are frozen, they take longer to bake, so I’m always just winging it, and keeping an eye on the cookies so they don’t over-bake. But since they are frozen, often it’s the other thing that is the problem: the center of the cookie doesn’t get baked enough.
Under-baked!
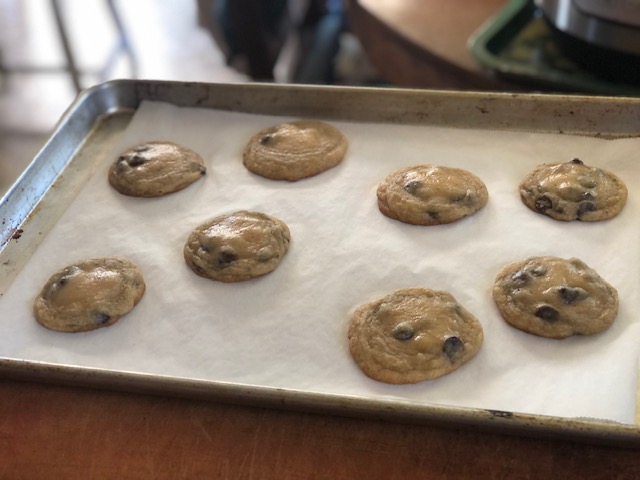
This very thing happened last night while we were watching Bridgerton, hehe… we finally got sucked in. I put some cookies in the oven to bake, and then ten minutes later pulled them out of the oven thinking they would continue baking on the cookie sheet. We have to pause the show every time I run into the kitchen, so I try to keep these kitchen runs to a minimum. After a while, I went back to inspect the cookies, and they were definitely under-baked in the center. Gooey is one thing, but under-baked is another. No thank you. So I cranked the oven up to 390° and put the cookies back in for another 6 minutes, I mean, what did I have to lose? When I pulled the cookies out the second time, they looked like they were perhaps over-baked, which equals cake-y, which I hate.

Do these look over-baked?
But somehow they were not cake-y at all! They were crispy on the bottom, and evenly gooey-chewy on the top! Why did this happen? Here is what I think: when I pulled the cookies out of the oven the first time, the outer part of the cookies cooled down and stopped baking, while the cooler center of the cookie had a little time to evenly disburse that coolness. So when I popped the cookies back in for the final blast of heat, the cookies were cool again, and got baked just enough while crisping the outside. No cakeyness! Is cakeyness a word? I think you know what I mean. I’m not sure I’m going to do this every time, but I am here to tell you that I’ve made this mistake a couple of times now, and I have not been disappointed. So here is the recipe, which is a standard chocolate chip cookie recipe*, along with directions on how you, too, can make the same mistake.
Crispy Chewy Chocolate Chip Cookies
(Adapted from the Tollhouse recipe)
- 2 3/4 cups all-purpose flour (330 grams)
- 1 teaspoon baking soda
- 1 teaspoon kosher salt (double if using Diamond brand)
- 2 sticks unsalted butter at room temperature
- 3/4 cup granulated sugar (150 grams)
- 3/4 cup brown sugar, packed (150 grams)
- 1 teaspoon vanilla extract
- 2 eggs
- 2 cups semi-sweet chocolate chips (330 grams) or 1 bag, which is a bit more
- Line a cookie sheet with parchment paper and set aside.
- In a medium bowl, whisk together the flour, baking soda, and salt. Set aside.
- In a large bowl or bowl of a stand mixer, beat together the sugars and the butter until light and creamy, about 3 minutes. Use a hand mixer if you are not using a stand mixer.
- Beat the eggs in one at a time, scraping down the sides of the bowl between each addition.
- Beat in the vanilla.
- Dump the flour mixture into the bowl and mix on low speed just until the flour is well incorporated.
- Stir in the chocolate chips with a wooden spoon.
- With a 1 1/2 Tablespoon cookie scoop (or you can eyeball this), scoop all of the dough into balls and place on the parchment lined cookie sheet. They can be very close together, since this is just for freezing purposes.
- Place the tray of dough balls in your freezer and freeze for a couple of hours before transferring the frozen dough balls into a ziplock freezer bag. Press as much air out of the bag as you can, and seal well. These dough balls can stay in your freezer for a couple of months and still be good for baking, if they ever last that long.
- Imagine time has passed, like maybe even weeks. When the mood strikes, preheat your oven to 375° and line a cookie sheet with parchment paper.
- Once your oven is preheated, place the frozen cookie dough balls on lined cookie sheet at least two inches apart.
- Bake on center rack of your preheated 375° oven for about ten minutes; the cookies should look melted and flattened out, but not cooked on top. Remove the tray of cookies from the oven and let cookies cool on the cookie sheet for ten minutes. Leave the oven on! You can go check your email or continue watching your show while you wait for your oven to get hotter and your cookies to cool a bit.
- After ten minutes (it’s okay if it’s a bit longer than ten minutes), put the cookies back into your already hot oven, turn the heat up to 390° or so, and bake for about 5 minutes, or until cookies start to look slightly dark brown around the edges, and the tops begin to take on a teeny bit of color. Remove from oven and let cookies cool on the cookie sheet for five minutes before transferring to a cooling rack to cool completely.
- Enjoy!
Note: *You can probably try this technique with any favorite chocolate chip cookie recipe you regularly use. If you try it, let me know what you think!

These wouldn’t last very long in my house!
Haha here either!! That’s why I keep those unbaked dough balls in the freezer!
Pingback: Angela’s Favorite Chewy Chocolate Chip Cookies | and everything nice