
 Making yogurt is my latest obsession. Along with pie crusts, scones, biscuits, and a few other things here and there.
This is my first post in a long time. I am still trying to figure out how to actually write a blog post on my computer – confusing!!! – but here goes.
Matthew (my dear husband) was getting tired of buying yogurt and having all of those plastic containers causing trouble with the environment, so I decided to try making yogurt myself. My friend Kristina told me how she makes hers, which was so simple and easy sounding, that I read a million blog posts on the subject, because her way sounded too good to be true.

Heating up the milk.
The first time I made it, I slowly heated up the milk (organic whole milk) in my slow cooker, which took over two hours to get it to the right temperature! It turned out great, but I didn’t like having to keep checking on it, so this time, I heated up the milk slowly in my dutch oven, stirring frequently. This is what Kristina suggested, and in the end, I liked her way best. It still took a little while to get it up to temperature (maybe half an hour?) , but I was going to be in the kitchen anyway, since I spend a lot of time in there… Anyway, keep reading if you want to know how to do this.
The milk (one gallon, which is a lot! You can use a half gallon if you prefer.) needs to reach 180° or a bit more, without scalding. A nice heavy bottomed pot or dutch oven will heat evenly. Don’t be in a hurry and turn the heat higher, because your milk will scorch and that will not be good for the flavor. Speaking of scalding and scorching, here is a trick: take an ice cube and rub it around on the inside of the heavy bottomed pot you are planning on using, and then just pour out the drops of water. No need to dry it. Somehow, this prevents scalding, but still pay attention! Pour in the milk and heat on medium heat, stirring frequently. Once it reaches 180°, take the pot off the burner and let the milk cool down (stirring occasionally) to about 115° or so… between 110° and 120° is fine. That’s a candy thermometer that I used – it works nicely! If you want to cool it down faster, place the pot in an ice bath and stir, but watch it like a hawk, because you don’t want the temperature to drop below 110°.
Once the milk is between 110° and 120°, take about a half cup of the warm milk and mix it together with about a half cup of room temperature, whole milk yogurt with live, active cultures (read the ingredients!). Mix together, then add it back into the warm milk and mix with a whisk, using an up and down and sideways motion, not a stirring motion. I don’t know why, but I read it somewhere.
Then put the lid on the pot or dutch oven and put it in your for-real big oven.
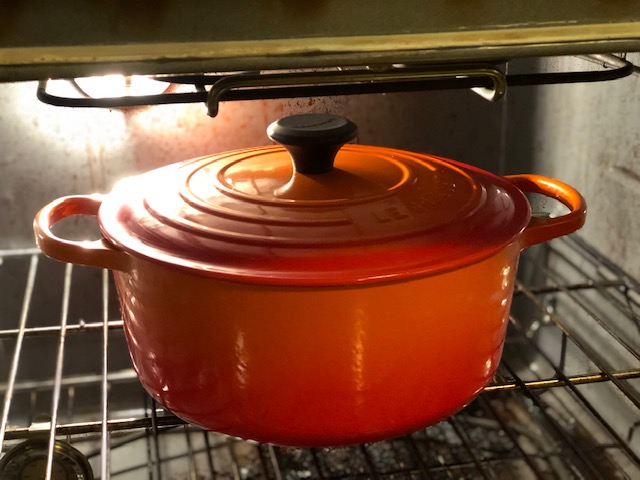
Drape a kitchen towel over it to help retain heat, and close the oven door.

I leave the oven light on, which generates just enough warmth to keep the bacteria multiplying. According to my oven thermometer, my oven stays at 100° when the light is on. Leave it in there for a while. Last time I left it in for maybe ten hours or so? This time I will try leaving it in for just eight hours. Actually, I ended up leaving this one in for 16 hours, and it was, well, fabulous. So there seems to be some wiggle room there. I’ve heard that you can let it incubate for up to 24 hours.
Longer time = tangier and thicker… or in my experience, just tangier.
You might want to time this so it works for overnight, since eight hours is a long time. I didn’t do that this time, and the milk/yogurt is in the oven as I’m typing this. Don’t disturb it! Don’t peek at it! Just leave it in there. After eight hours (or longer!), take it out and take a look. It might look something like this:

Magic!
This is a very exciting moment, so take it all in.
Creating in the kitchen is a beautiful thing.
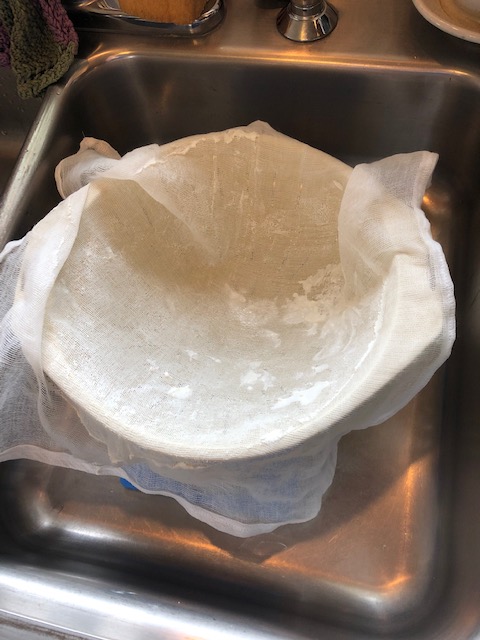
Now, at this point, you can just put the pot in the fridge and let it chill. You’ll notice that there is some separation of liquid from the yogurt; that’s the “whey”. You can just stir it in. Your yogurt will be light and delicious. BUT, if you like it a little thicker, more like a Greek yogurt, you’ll want to strain the yogurt.
Put a colander into a large glass bowl. Line it with cheesecloth (I got mine at Whole Foods – a whole lot of it for just $2.99. Yes, you got that right, at Whole Foods.) OR, you can make reusable cheesecloth. Pour your yogurt into the cheesecloth-lined colander, and let the whey strain out. You can let it strain for three or four hours if you like. The more you strain, the thicker the yogurt will be. This is what mine looked like:

Straining – be patient!
This was before I got really impatient and started messing with it to see if I could make it strain more quickly by pulling up the corners of the cheesecloth. When I did this, the whole thing tipped over and half of the yogurt spilled into my sink :(.
This was a very sad moment. So don’t do that. Just let it sit there and don’t touch it!
When you feel the yogurt has strained long enough, pour out the whey, or save for other uses, and use a large ladle to spoon the yogurt into a large glass bowl. As you come to the edges of the cheesecloth, hopefully the yogurt will easily pull away from it, like this.

And if you are lucky, you will have hardly a bit of waste, because the yogurt pulls away so cleanly.
Your yogurt will be very lumpy in the bowl, with a variety of textures. Go ahead and whisk it vigorously, and it will end up looking like this.

Silky smooth!
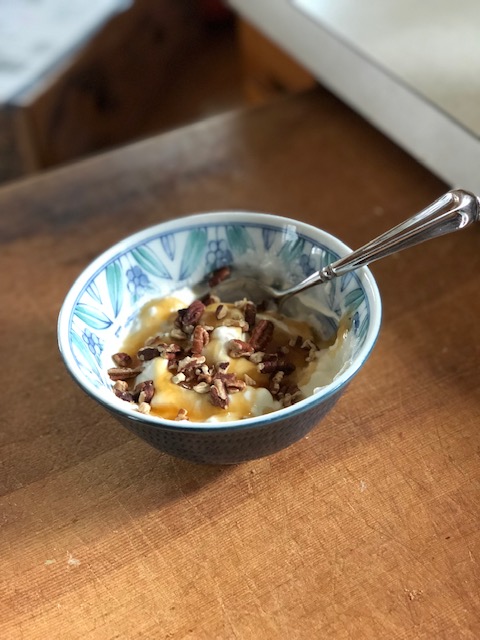
Put it in a glass container (or several) with a good lid and put it in your fridge, where it will firm up, but you might just have to eat some at room temp because it is SO delicious! I had some with honey and pecans right away, and it was amazing! It reminded me of the first time I had real Greek yogurt in Greece. It was an eye opening experience to realize that yogurt could taste so good.
Success!
And if you want a wonderful way to enjoy pancakes, try them with a dollop of this yogurt, and then add your maple syrup (pure maple syrup, of course). SO good!
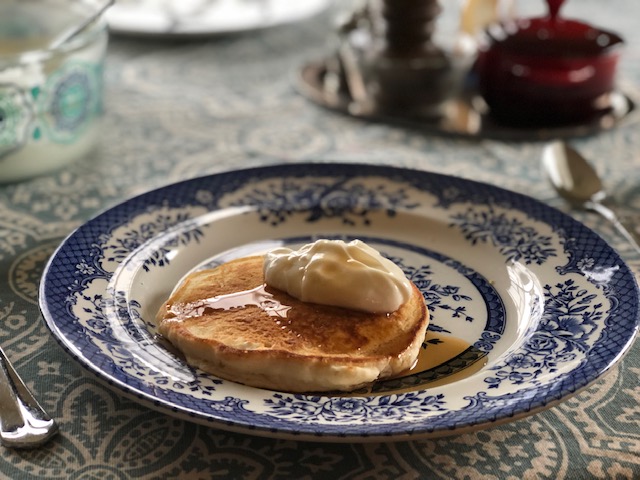
Divine!
And now dear husband Matthew can have really delicious, organic whole milk yogurt in glass containers! No more plastic! And I have reused old jam jars that were too cute to throw away… I heated up some frozen blueberries with a bit of brown sugar and corn starch, let it cool, and put it in the bottom of the jars, top with yogurt, and voilà!

Too cute!
Update 3/16/21: I have a slightly different method for the incubation period, since I now have an instant pot with a yogurt function. You can read about this here.
Here are a few links to blogs/websites that I found helpful, and have more detailed information:
https://www.daringgourmet.com/easy-homemade-greek-yogurt/
https://cooking.nytimes.com/guides/52-how-to-make-yogurt

So it sounds like you didn’t end up using your instant pot at all, right? This seems too easy! I always thought it would be very complicated involving lots of special tools and equipment. BTW, have you heard that Greek yogurt is terrible for the environment? I’ve heard that, but I still don’t understand why that would be. Fun post and I want to try it!
Hey Susan! I absolutely love making this yogurt! It’s very easy, and no special equipment is necessary, although a candy thermometer comes in handy. I hadn’t heard about the issue of toxic waste, but I read this article and found it interesting: https://www.npr.org/sections/thesalt/2012/11/21/165478127/why-greek-yogurt-makers-want-whey-to-go-away
But that is more about factories that are producing tons of whey and don’t have a method to safely dispose of it. I have saved the leftover whey one time and put it in my freezer. I haven’t used it yet, but have heard you can use it to water your plants, add to your smoothies, replace water in bread recipes, and even make lemonade with it! It is higher in protein and very good for you. The other two times I have made yogurt, I didn’t let it drain as much, so there was less whey. I did just throw it out, but I will be more thoughtful about it now. Thanks for reading my post!
This has been a raging success. I haven’t really been happy with the flavor of any of my commercial yoghurt options (and yes, I insist on yoghurt with an h, the way it was when I was a kid) and Angela’s yoghurt is delicious; not too sweet, not too thick, and she even flavors it with “fruit on the bottom”. Plus, I hated throwing away a plastic tub every day. Even though I was rinsing it and putting in the recycle bin at work, I kept thinking of that bigger-than-Texas floating plastic garbage raft out in the Pacific, and how the plastic we’ve littered into the world is now in the fish we harvest from the sea, so we’re eating our own trash. Now I have great tasting yoghurt made with only ingredients we know the provenance of and bring the glass jar home to use again. Thanks, Hon!
Oh, sweet husband, I am so glad you are loving the yogurt! Thanks for the rave review :). xo
Inspired. Let’s see if it lasts long enough for me to try it at home. And BTW, I adore your blog-voice. Real. Simple. Precise. Adorable. Also, no need to take a food photo class; your pics are just right. Can’t wait to see what comes next!
Thanks Lisa! I love that you are reading my posts :). I will be making yogurt again tomorrow, and will try to time it so that it only incubates for eight hours. I want to see what the difference in flavor is. If you make it, let me know how it goes! xo
Pingback: Reusable Cheesecloth | and everything nice
Pingback: Favorite Nutty Granola | and everything nice
Pingback: Homemade Yogurt, Take Two! | and everything nice