
I wanted to find out what all the fuss was about with this No Knead bread business. My family and I were visiting family in St. Louis, and our friend Brian made a loaf – it was beautiful, and so yummy! He gave me Jim Lahey’s recipe from the New York Times, with a few tweaks that worked for him. I just recently got it in my mind that I had to try making this. My first attempt was burnt on the outside, and gummy on the inside….. What did I do wrong?

Burnt on the outside and gummy on the inside.
I read many articles and blogs about this… about the no-knead bread turning out gummy, and the crust being burnt, and some of the replies were “Sounds like you are doing everything right!”. Well, I know what I like, and I know what good bread tastes like, and this wasn’t it. So the next time I reduced the temperature of my oven, and here is what I got.

Beautiful, right?

Looks perfect, but it’s still gummy!
So this second time, although the bread looked pretty, it was still gummy. My family loved it, but I was not happy about it.
Let me say that I am a bread “newbie”. I don’t really know what I’m doing. I’ve worked with yeast a little bit for things like cinnamon rolls or yeasted dough crumb cake, but my actual bread experience is very limited. A couple of years ago I made bread using The New Artisan Bread in Five Minutes a Day book. I made it for a couple of weeks, but then stopped. I can’t even remember how it was or why I stopped. I’m just like that sometimes.
But back to now. One thing that this no-knead recipe was missing was details. Being that I’m such a newbie, I really needed more details to do it right. For example, it said that you want to let it rise for 12 to 18 hours, with 18 hours being ideal. So that’s what I did. Both times. 18 hours. The recipe states that the dough should be covered with bubbles when it is ready. Here is what mine looked like.

Just try to erase this out of your mind now.
Okay, so the problem here is that I didn’t know what I was looking for. Bubbles? What kind of bubbles? How many bubbles? The recipe just said the dough would be ready when the top was covered with bubbles. Dear husband and I agreed, more bubbles is better, right? Well, no. If you look at the picture above, and really, I can’t believe I am even posting it, because it is one ugly picture, you will see that all of the bubbles have popped open, and the dough has started to collapse and turn gray :(.
For me and my kitchen, 18 hours was way too long to let the dough rise, and my kitchen overnight is not a warm kitchen. And here’s another disaster that happened. Because the dough had collapsed and was wet and difficult to handle, when I put it in a well floured towel to let it have its final rise, the dough stuck to the towel something fierce. It was a huge mess!!!
The entire experience was very frustrating, so hopefully, if you follow these directions (still Jim Lahey’s recipe), with pictures and lots of details!!!, you won’t have to make the same mistakes that I made. Here you go:
Put 3 cups (13.5 ounces) all purpose flour into a large bowl. Add 1 tsp salt (or a tad more), and 1/4 teaspoon Instant Yeast and stir it all around with your hand to mix well.
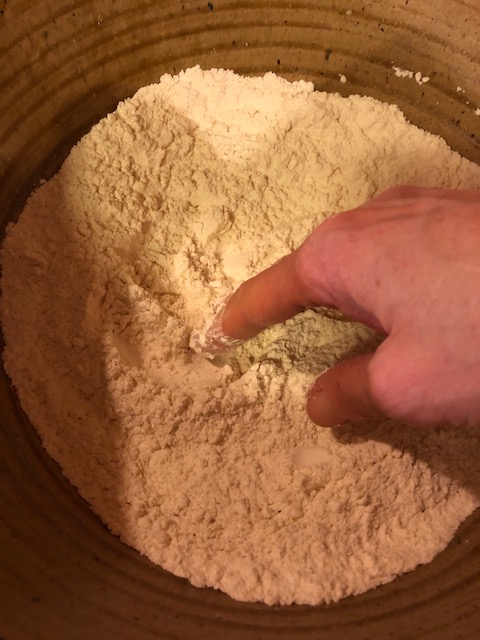
I love using my fingers for this.
Now add 1 and 1/3 cups cool to room temp filtered water and stir with your fingers quickly until you end up with a shaggy dough.

Cover bowl with plastic wrap and put it somewhere it will be undisturbed for about 12 hours, but you decide after looking at the bubbles! Start checking at 11 hours. After 12 hours, mine looked like this:
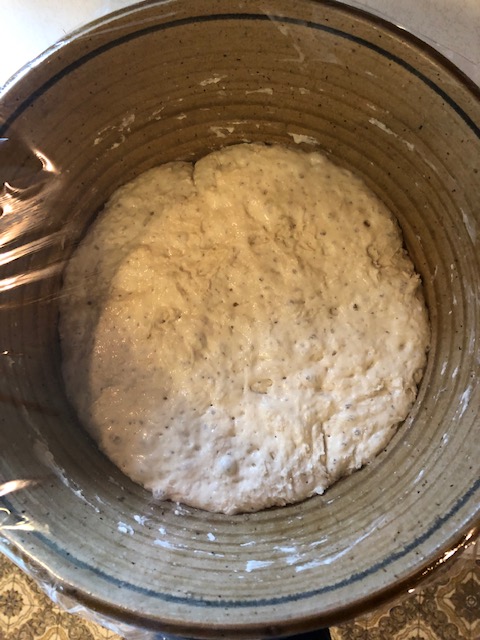
Bubbles!
Here is a close up of the bubbles. They kind of look like chewing gum bubbles right before they pop. It’s okay if some of them have popped, but you want plenty of them to still be un-popped.

I know it looks weird, but now you know what to look for!
When your dough has reached this stage, lightly flour a counter top or working surface, and scrape the dough out onto it. I scrape with my fingertips to make sure to get every bit.

Flour your hands and flour the dough lightly, then stretch it to shape it into a rectangle. Stretching the dough is good!

Ok, so it doesn’t have to be a perfect rectangle, but you get the idea.
Then fold over the right side.

Then fold over the left side.

Rotate it a quarter turn.

Fold the right side over again.

And now the left side.

Now sprinkle the top with a little flour and cover lightly with plastic wrap. Let it sit for about 15 minutes while you go have a cup of tea.

After 15 minutes, get a kitchen towel (NOT terry cloth) – I like the tea towels from Trader Joe’s or IKEA – and put a generous layer of course stone ground cornmeal or wheat bran on the towel. You can also do this with flour, but I am so traumatized after my dough sticking that one time that I use corn meal instead – it works for Brian every time. But really, that old dough stuck so badly because it had fermented too long, but let’s continue.
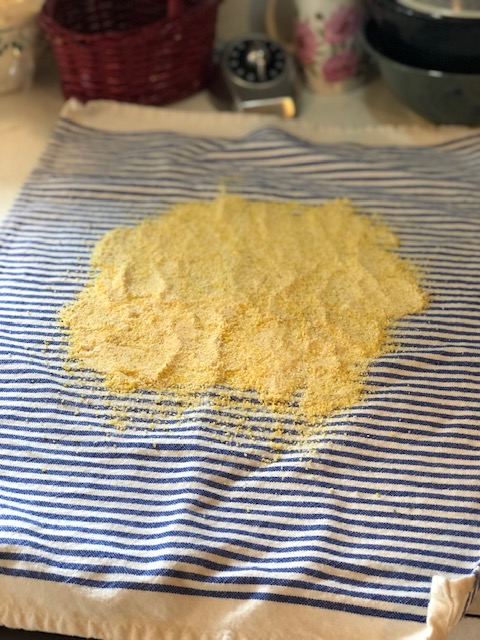
Yes I use that much.
Flour your hands and try to shape your dough into a ball shape. I say try because I’m just not very good at this part. Take your dough ball and place it seam side down on your towel. Sprinkle the top with corn meal or wheat bran or flour.

Pretty!
Now very loosely cover the dough by folding over both sides of the towel. Loose so that it has room to rise. Let it sit for a total of two hours, but be aware that at the 1.5 hour mark, you will need to turn your oven on to 450° (please use an oven thermometer) and place a dutch oven with lid (and oven-safe knob) into the oven to preheat. You want to give your oven and the dutch oven a solid half hour to get good and hot!

Leave it alone.
During some of that two hours, clean up the flour mess with a bench scraper. I love my bench scraper.

A bench scraper makes quick and easy work of floury messes.

At two hours, your dough should hopefully have doubled in size, and your oven should be crazy hot!

It really did get bigger!
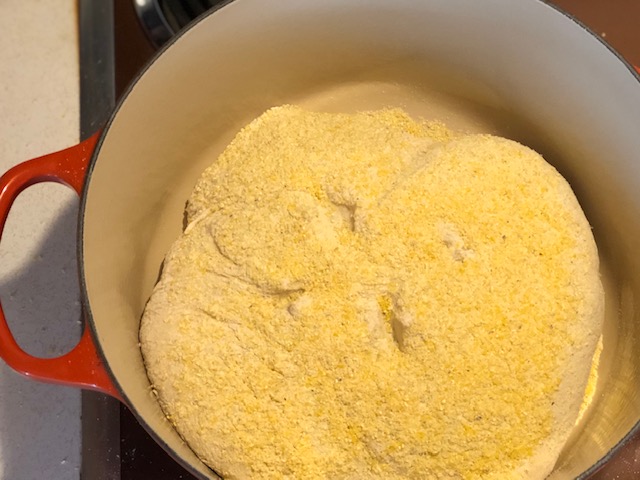
With oven mitts or cute potholders that your kids made for you, pull out your dutch oven (I use a Le Creuset dutch oven) and carefully take the lid off. Remember that your dough is seam side down on the towel. Place your hand on top of the dough and flip it over into that hand so that the seam side is up. Now plop it into your dutch oven, seam side up. This can get a little confusing, and I’m pretty sure I screwed it up on my third try, but the bread still turned out great. Grab your mitts and shake the pot a bit to center the dough.

Hard to tell, but it is seam side up.
Don’t worry about all the cornmeal, or whatever. You can always brush it off when the bread is done. Now, to help the bread to rise evenly, take some kitchen scissors and make four even cuts into the dough. I know it’s hard to see it, but I really did get in there with scissors.

Snip Snip
And the four cuts look like this.
With your oven mitt, put the lid back on your dutch oven and put the whole thing back in the oven.

Quit looking at the bottom of my oven. That’s not what this picture is about.
The lid keeps steam in for the first part of the baking, which creates a lovely, crispy crust. Set your timer for 30 minutes. When the 30 minutes are up, take the lid off of the dutch oven. Your bread might look something like this.

Gorgeous!
Set your timer for 15 more minutes, and continue to bake your bread without the lid. This last part crisps up the crust nicely. You can peek at it and make sure it isn’t getting too dark for your liking. When the crust looks the right color to you – dark is good, and I find that 15 minutes is about right – get your oven mitts and take the pot out of the oven. With a spatula, carefully remove the bread from the pot and place it on a rack to cool. If you tap the bottom of the loaf, it should sound hollow.

Sunny day in Seattle makes for strange lighting!
Now, here’s a cool thing. Get close to your work of art and listen. If all went well, you should hear the crust crackling. Magic. It is best to let the loaf cool for two hours, because it continues to cook during this time. You might be able to get away with one and a half hours, but do try to be patient! Now brush off the excess cornmeal or whatever, and dig in.

I know, there’s a big old hole in the middle, but if you watch Jim Lahey’s videos, his breads are full of big holes. It’s the taste and texture that I’m concerned with, and this bread is really delicious!
Update: I have been making this bread at least once a week now, and just yesterday, I got so busy that I forgot about dough that was resting in the bowl since the night before. By the time I got to it, it had been rising for almost 16 hours. But the dough still looked fine. So I made the bread, and it was amazing. Best yet. The crust was thin and crispy/chewy, and the bread was light and airy and melt-in-your mouth delicious. So here is what I think – the first couple of times I made the bread, I followed Jim Lahey’s recipe exactly, which called for 1 5/8 cups water. Then I had that wet dough sticking to the towel, so I reduced the water to 1 1/2 cups. The bread still came out gummy. Finally, I reduced the water to 1 1/3 cups, and that is the magic amount *for me*. Letting the dough ferment longer yesterday just made it better. Here is the thing: if you use a measuring cup and just jam it into your flour to measure, your flour will be tightly packed, thus using more flour, and needing more water. I always stir up my flour to aerate it, and then spoon it into the measuring cup to measure before leveling. So I didn’t need as much water. You have to find the perfect amount of water for you. Trial and error is part of the process. I hope you make this bread, and I hope you love it as much as my family and I do.
Enjoy it toasted with your morning scramble.

Enjoy it with your favorite soup… it is so good with split pea soup.

Or just enjoy it all on its own.

Here is what you will need to make this bread:
- Dutch oven with a lid
- Large bowl
- Plastic wrap
- Kitchen towel
- Cooling rack
- 3 cups all purpose flour
- 1 1/4 tsp salt
- 1/4 tsp instant yeast
- 1 1/3 cups filtered water (tap water is ok too)
- More flour for dusting
- Course stone ground cornmeal or wheat bran or more flour
Other things that come in handy:
- Oven thermometer
- Bench scraper, to clean up flour mess!
If you make this bread, or have already done so, let me know what you think!

Pingback: Velvety Vegan Split Pea Soup | and everything nice
Pingback: Limpa Bread (Swedish Rye) | and everything nice
Pingback: German Style Crumb Cake | and everything nice