

Mara’s mushroom pizza.
I know it’s time to blog about a recipe when, week after week, I keep referring to a sloppily jotted down recipe on a piece of scrap paper, feeling nervous that I might lose it…

I’m sentimental about this piece of paper, so I’m keeping it!
Friday night is pizza/movie night at our house, and I’ve been making yeasted pizza dough from scratch for quite a while now. About a month ago, I knew I would be too busy to deal with pizza dough at 4pm like I normally do, so I decided to try my hand at sourdough pizza dough. I mean, how hard could it be? If you can make a loaf of sourdough bread, you can certainly make sourdough pizza dough. Right?

Ripe starter is a must!
I simply tweaked my favorite pizza dough recipe, kind of winging it by removing the yeast and replacing with sourdough starter, and tweaking some measurements a bit, and I was thrilled with the results! Why, you may ask, would sourdough be easier than a yeasted dough? Well, it’s about timing. I was going to be busy all afternoon, which is normally when I would be making that yeast dough. With sourdough, I put the dough together first thing in the morning (I do have to feed my starter the night before, but that’s quick and easy), and after a few stretch and folds, which are optional, I don’t have to look at the dough again until about 6pm or later, at which time I divide and shape the dough into balls for individual pizzas, or just two balls for two large pizzas. Then let the dough rest for about an hour while I preheat the oven/pizza stone and get my toppings ready.

Sourdough pizza dough with Italian herbs.
And here’s a nice benefit of this sourdough pizza dough – it is incredibly easy to shape! You pick it up and it stretches seamlessly in your hands! I’m not sure why that is, and I’m not going to question it. I’m just going to enjoy the beauty of it.

Let gravity do the work.
And the flavor? So very good!

Millie’s cheese pizza.
One thing I like is to have all of the ingredients very simple. I like to enjoy the flavor of each ingredient, so I don’t want anything to overpower anything else. For pizza sauce, I use tomato paste, then add just enough tomato sauce to the paste to get a spreadable texture. That way the sauce is not at all watery… wet pizza sauce makes for a soggy crust!

This is all you need!
And the toppings for the pizza should be sparing… you don’t want to weigh down your crust. For a light and airy, crispy crust, you’ll want just a thin layer of sauce, thin layer of shredded mozzarella, and a sprinkling of your favorite toppings. Don’t overdo it! Matthew likes pepperoni and green bell pepper, Mara likes mushrooms, I like mushrooms and feta, with the occasional black olive or two, and Millie likes straight cheese. What are your favorite toppings?

Matthew’s pepperoni pizza.
Sourdough Pizza
(Makes 4 individual pizzas, or 2 large pizzas*)
For the dough:
- 320 grams room temperature water (filtered if possible)
- 100 grams active, bubbly starter
- 2 hearty tablespoons (30 grams) extra virgin olive oil
- 1 teaspoon granulated sugar
- 490 grams bread flour**
- 2 teaspoons (12 grams) kosher salt
- 1 hearty tablespoon Italian herbs
For the sauce:
- 1 6 ounce can tomato paste
- ~1/2 can (15 ounce can) tomato sauce
For the toppings:
- 4 cups shredded mozzarella cheese
- Diced or thinly sliced veggies such as mushrooms, bell peppers, etc
- Cooked sausage or pepperoni
- Anything else you like!
- The night before you plan on making your pizza dough, feed your starter and leave on the counter overnight. You will want to end up with 100 grams of bubbly active starter for your recipe. I usually will take about 40 grams of starter, and feed it 60 grams of water and 60 grams of all-purpose flour. I add a teaspoon of rye flour to jazz things up.
- First thing in the morning (this is flexible!), mix your dough. Put 320 grams room temperature water into a medium mixing bowl. Add 100 grams active bubbly starter (put any leftover starter in your fridge), 2 hearty tablespoons (30 grams) olive oil, and 1 teaspoon granulated sugar to the water. Stir together with a fork (or I use a Danish dough whisk) until the starter is well incorporated and everything looks milky.
- Add 490 grams bread flour, 2 teaspoons (12 grams) kosher salt, and 1 heaping tablespoon Italian herbs. Mix well with large fork or dough whisk until everything comes together and you no longer see any dry flour. Dough will be shaggy.
- Cover and let dough rest for 30 minutes to an hour or so.
- After the dough has rested, scrape down the sides of the bowl all the way down to the bottom with a flexible bowl scraper or spatula. Then, using a slightly wet hand (I keep a bowl of water handy), grab the dough from the side of the bowl and press it into the center. Rotate the bowl and continue to grab and press until you’ve gone around a couple of times. This should take maybe about a minute. The dough will become more elastic and springy rather quickly. Try to incorporate any chunky bits until the dough looks smooth. Flip the dough over in the bowl (smooth side up), cover the bowl with plastic wrap or similar covering, and leave on your counter.
- After thirty minutes to an hour, once more scrape all along the side and bottom of the bowl with a wet spatula to make sure the dough isn’t sticking. With wet hands, scoop up the dough from the middle, letting the dough hang and stretch. Gently release the dough into a pile and rotate the bowl one quarter turn. Repeat, scooping up the dough and letting it hang and stretch. I sometimes jiggle it to encourage it to stretch a bit more. then cover the bowl and leave on the counter. These are called coil folds, and they will help develop the gluten in the dough, giving your dough a nice structure. Leave the dough in the covered bowl on your kitchen counter. You can come back and do another set of folds in about an hour if you like. Then leave the dough covered for anywhere from six to eight hours, or until it has almost doubled in size (don’t worry about the exactness of this… it’s pizza dough!), and has a bubble or two on the top.
- About one hour before you would like to be baking your pizzas, lightly flour your counter and scrape the dough out, sticky messy side facing up. Cut into four pieces for individual pizzas, or two pieces for two larger pizzas with a sharp knife or bench scraper (I like to weigh the pieces of dough so that the pizzas are all the same size, but that’s just me).
- With the sticky side still facing up, pull the sides of the dough pieces into the center and pinch together, making a little sack. Turn seam side down and roll into a ball with a cupped hand, tightening the shape. You will need to sweep off any flour that is on the counter surface in order for this to work. Here is a great video from King Arthur Baking Company that shows how to do this: How to shape dough into balls.
- Place the rolls seam side down on a greased or parchment lined baking sheet, equally spaced. Cover with tea towel or upside down baking sheet and let rest for an hour. At this time, place one oven rack on the lower third of your oven, and one oven rack on the upper third. Place a pizza stone or other such baking stone on the bottom rack. Preheat your oven to 550°F.
- While oven is preheating, you can prepare your sauce and toppings. Of course, you can use any kind of pizza sauce you like, but here’s how I do mine, which is very simple: In a small bowl, mix together one 6 oz can of tomato paste with 1/4 cup tomato sauce. It will still be pasty. Now add more tomato sauce little by little until you get a spreadable consistency. The sauce needs to be saucy enough to not tear your dough when spreading it, but not so wet that it makes your pizza soggy. Taste it; if it is too acidic for you, add a dash of sugar. Set aside.
- Prepare your pizza toppings. Whatever you choose, you want nice thin slices or small diced veggies. After chopping or slicing your toppings, if any are juicy, such as bell peppers or tomato slices, press them between layers of paper towels to remove some of the moisture so they don’t make the pizza soggy.
- Time to prepare your pizza dough! Just a heads up: unlike yeast dough, your sourdough pizza dough balls will have spread out and look flatish. Don’t worry! Here’s what you do. Place a square of parchment paper on a rimless baking sheet or pizza peel. With floured hands, pick up one of the dough balls. You may have to gently scrape it off the parchment with a bench scraper. Rotating the dough in your hands, it should start to stretch out. Keep rotating the dough, holding onto the edges. You can drape the dough over the tops of your hands to gently gently stretch it a bit more, keeping it round in shape. Now place the dough onto the prepared baking sheet, reshaping a bit as necessary to make it round. Dimple the dough with floured fingers to prevent any large bubbles from occurring during baking.
- Spread a thin layer of sauce over your dough. I like to take the sauce all the way to the edges. Sprinkle with mozzarella (you should still be able to see the sauce… go easy on the cheese!), then add your toppings sparingly. A bogged down pizza will be soggy and will not bake through. Repeat with all of the pizza dough, or have your minions do it at the same time you are making yours. I store any leftover sauce in the freezer and use it the following week. Leftover toppings can be used for omelets or stir-fries. Don’t throw anything away!
- Now that your pizza is ready to go in the oven, cut the parchment paper around the edge of the pizza, leaving a “tab” (there will be a picture tutorial at the end of these instructions if this sounds confusing). Open your oven, which should be good and hot, and slide the pizza, parchment and all, onto the hot baking stone, with the tab facing you. Close and let pizza bake for about three minutes. Open oven and gently lift the edge of the pizza with a fork, and if the pizza bottom looks like it needs more time, let bake for another minute. At this point, you can remove the parchment by yanking on the tab. I yank it out with my fingers because the parchment isn’t hot to the touch. I lift the tab with the fork, grab tab, then hold the pizza edge with fork while I yank out the parchment so the pizza doesn’t come with it, but you can skip that part if you don’t feel confident. I usually end up baking the pizza on the stone for a total of four minutes, but it varies. The first pizza always bakes faster, by the way. Now, using the rimless baking sheet, slide the pizza onto the sheet using a fork, and transfer the pizza to the top rack without the parchment paper, which you will remove and discard if you haven’t done so already, and let it bake for two more minutes, or until it looks done to you. The top will get a bit charred. If you don’t like the top of your pizza charred, keep an eye on it. (What I love is when it gets a bit charred, and the edges that have that tomato sauce char and are so delicious!) Remove pizza and place on cooling rack. Now repeat with all the other pizzas. Each pizza take about 6 minutes to bake (4 minutes on bottom rack and 2 minutes on top rack), so the whole baking operation should take about half an hour, give or take a few. If you would like to streamline the process a bit, you can put the second pizza in at the same time that you move the first pizza to the top rack, but this takes a bit of practice, and I wouldn’t recommend it unless you are feeling super confident. Burning one of your precious pizzas is really really sad and disappointing.
- Now that all of your pizzas are baked, they are at differing levels of hot. At this point, I turn the oven off, but it’s still super hot in there, and I will toss in the first pizza onto the pizza stone for thirty seconds just before slicing it. Same with the other pizzas as necessary. Can you believe we do this over here every Friday night???? The whole process may seem a bit overwhelming, but it’s fun when everyone helps making their own pizzas, and it does get easier with a bit of practice. And the sourdough pizza crust is so so very good!!!
Notes:
* The size for the individual pizza (when making four) is approximately 9″, and the size for the large pizza (when making two) is approximately 12″. There is a total of about 960 grams of dough, so you can divide it any way you like. I have divided it into 5 individual pizzas and they were still a good size! The shaping of the larger ones can be a bit unwieldy, so although it’s more work, I still prefer to make the individual pizzas.
** I’ve been using Cairnspring Mills Organic Expresso Bread Flour. It is amazing. Cairnspring Mills is a local mill a little over an hour drive north of Seattle, in Burlington. They use grains from local farmers for their flour. If you have anything like this near you, I highly recommend it for flavor that just cannot be beat, and you’ll feel so happy knowing where your flour is coming from. I also love King Arthur flours, which are always consistently good.
And now, here is a picture tutorial:

Feed your starter the night before!
Happy active starter the next morning.

Put water, starter, oil, and sugar in medium bowl.

Mix until milky and starter is well incorporated.

Add flour, salt, and Italian herbs.

Mix well; dough will be shaggy.

Cover and let dough rest for 30 minutes to an hour.

Loosen edges of dough with flexible bowl scraper.

Using wet hand, pull dough from side and press into middle.

Rotate bowl and continue pulling and pressing dough to center.

After about a minute, dough looks like this.

Flip dough over so it is “smooth side up”.
Cover and let rest for about 30 minutes to an hour.

Dough might now look like this.

Coil fold! Pick up dough from center with wet hands, and let it stretch. Release onto itself, rotate bowl, and repeat a couple of times.
Cover and let rest for 6 to 8 hours, or until dough has almost doubled in size.
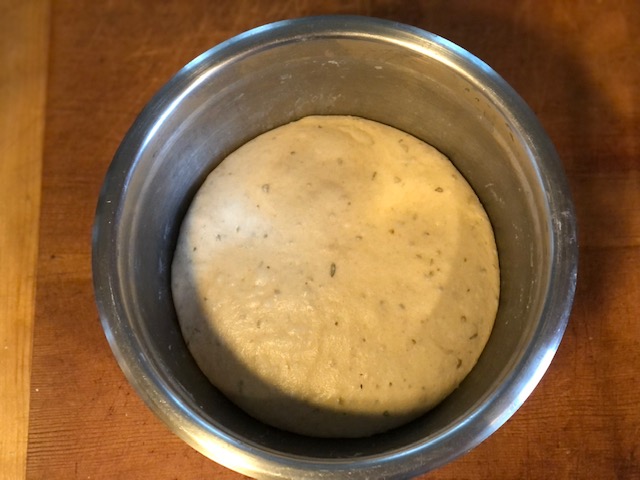
Now dough might look like this. You can see some bubbles, and dough is soft to the touch.
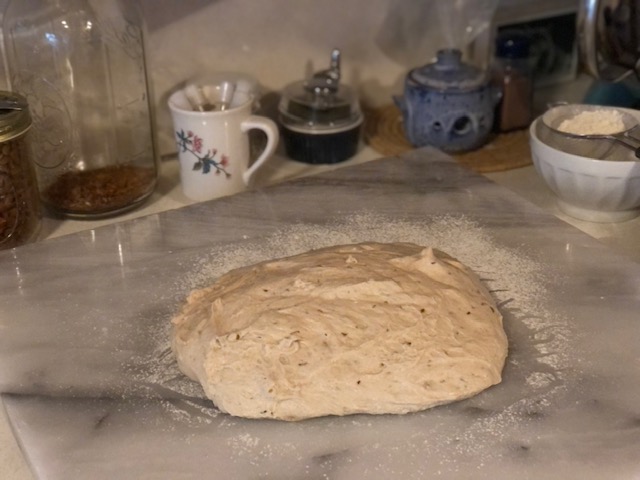
Scrape dough out onto lightly floured surface.

Cut dough into four equal pieces.

Pull edges of dough up and pinch at top.

Flip dough over and cup with your hand, gently rotating dough to create tension.

Place dough balls on lightly floured parchment lined baking sheet.

Cover and let rest for an hour or so.

While dough is resting, place racks on bottom and top thirds of oven and get your pizza stone in there. Preheat oven to 550°.
Make sauce.

Prepare toppings.

After about an hour or so, the dough will have spread out.
Time to shape dough! Pick it up and rotate by the edges to let it stretch.

Gently let it drape over hands to stretch it more.

Place on prepared baking sheet and shape a bit more if necessary.

Dimple dough with fingers, then add sauce and cheese; we are getting close!

Add toppings… not too many!

Cut parchment and leave a tab.

In the oven! Sorry for the terrible photo…

First pizza is now on the top rack. Second pizza is on bottom rack, but you don’t have to do two at a time.
Pizza is done!!

This one is mine: lots of char!

And in homage to St. Louis style pizza, I always cut mine into squares :). Enjoy!

Beautiful pizza, and really good instructions.
PS My recipe jotting looks the same, and if I wait to long, it’s hard to decipher!
Ha ha yes, Dorothy! Those jotted down recipes get spilled on and who knows what else! Thanks for your kind words; I know you know how challenging it is to write out so many details… much harder than just making the recipe!
It certainly is difficult, especially that we’re often just winging it!
Exactly!!
Pingback: Easy Sourdough Starter Maintenance | and everything nice