
Growing up, pumpkin pie was a big deal around our house. It was kind of legendary… well, to us anyway. Every Thanksgiving my mom would make 5 or 6 pumpkin pies, along with all the other traditional fare, and we would have a huge gathering with all the cousins. The recipe my mom used came from my paternal great grandmother Cornelia, whom I never met. I have an old recipe card with her recipe, type-written by my mom.

What I love about this recipe card is seeing all the additions and modifications; clearly my mom suffered over getting things just right in the same way that I do. And the secret ingredient for this pie? Bourbon. You can see written in on the card at the bottom in my mom’s handwriting, “1 tsp grated orange rind instead of bourbon“, and then it is crossed out. I’m laughing to myself about this. Sorry, but orange zest just won’t do it. On the backside of this recipe card my mom typed out her own version.

So on this one, she basically doubled the recipe, increased the sugar, halved some of the stronger spices, tripled the pumpkin, decreased the bourbon… well, she changed a bunch of things. And here’s another funny bit. At the bottom of the recipe card, next to the bourbon, she wrote, “or 1 jigger sherry brandy“, and then that got erased. Not just crossed out, but erased! But you can still see it if you look closely. I’m guessing my mom really wanted to replace the bourbon with other things, but in the end, the bourbon won out. And what is a jigger, you may ask?
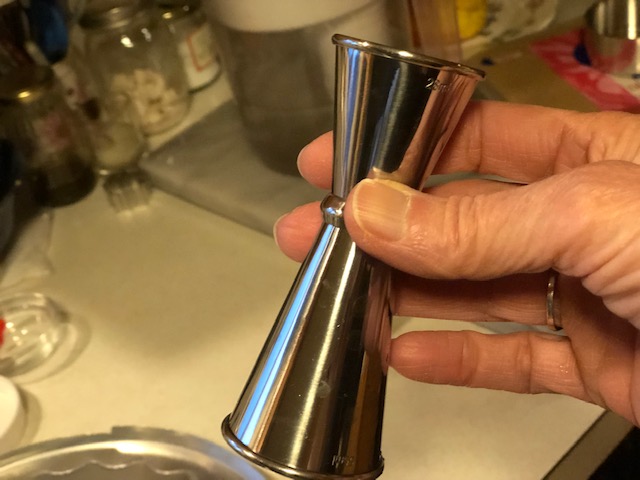
Here is a jigger! Maybe Cornelia had one of these?
A jigger is a measurement equaling approximately 2 tablespoons, so if you don’t have one of these cool jigger-measuring-thingies, you can just use a tablespoon. But when I found one of these at the thrift store, you know I had to get it.
To be honest, trying to make a really good pumpkin pie with a really good crust is what started my obsession with pie crust, oh so many years ago. Every time November rolled around, I found myself still not being able to make a decent crust. Now here is the kicker: sometimes I could make a decent crust, but then when I would use it for a pumpkin pie, suddenly that pretty decent crust became either tough and disappointing, or flabby on the bottom. And then the dreaded cracked pumpkin pie would happen too.

Smack dab in the middle.
So here I am finally writing about this pumpkin pie, because I think I’ve finally got it figured out! What’s the trick? Well, first of all, I don’t use the directions on the back of the Libby’s can of pumpkin; that renders a soggy bottom of a pie crust. Not that there is anything wrong with that. That is what I grew up with, and that’s how I always thought it was supposed to be! But for a well baked pie crust, I “blind-bake” the crust. Like, blind-bake the heck out of it. Way more than I ever thought was possible or necessary.
Ready to go into the oven to “blind-bake”.
Secondly, I don’t stick a knife into the pie to see if it’s done. Instead I check by nudging the pie plate while it’s still in the oven: if the pie filling ripples like miniature waves, it’s not done yet. Once the pie filling jiggles (like jello) in the center, but doesn’t ripple, it’s time to take it out of the oven. The custard will continue to set after removing it from the oven.

Right out of the oven. It will settle down in a few minutes.
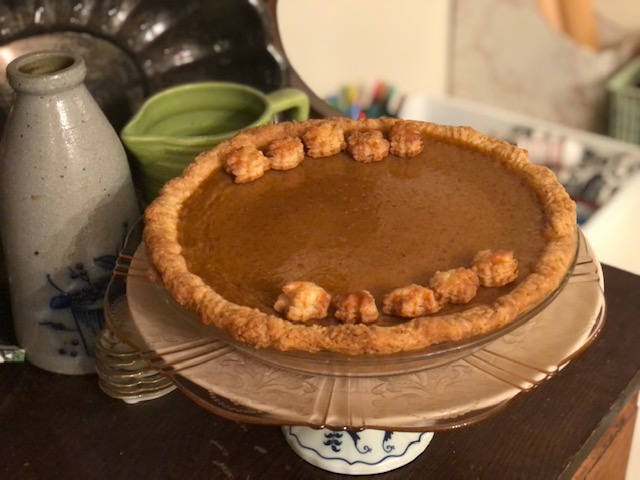
In the end, I decided I like Cornelia’s original recipe. It is creamy, dark and spicy, not too sweet, and not too squash-y either, if you know what I mean. I did make a few changes, so it’s a mix of her recipe, my mom’s, and my own.
Cornelia’s Pumpkin Pie
- 1 disc pie dough* (made from scratch – try this one or this one)
- 3/4 cup granulated sugar
- 2 tablespoons all-purpose flour
- 1 teaspoon kosher salt
- 1 teaspoon ginger
- 1 teaspoon cinnamon
- 1/2 teaspoon allspice
- 1/4 teaspoon cloves
- 2 large eggs at room temperature
- 2 cups Libby’s pumpkin (or fresh roasted pumpkin, well drained)
- 1 1/4 cups heavy cream at room temperature**
- 1 jigger (scant 2 tablespoons) good quality bourbon
- 1 egg yolk for egg wash
- Roll out your pie dough, put it in a pie pan, crimp as desired, and refrigerate it in its pan for at least 30 minutes. A couple of hours is better. (You can do this up to a day or two ahead of time if you like. Once the crust is well chilled, wrap it well, pie pan and all, and store it in your freezer until you are ready to bake it.)
- When ready to get started, preheat your oven to 400° and make sure to have one oven rack in the lower third of your oven and one oven rack in the center. Pop your already chilled pie crust into the freezer while the oven is preheating.
- In a small bowl, whisk together the sugar, flour, salt, ginger, cinnamon, allspice, and cloves. Set aside.
- In a large bowl, whisk the eggs until well beaten. Whisk in the sugar/flour/spice mixture. Next whisk in the pumpkin, heavy cream, and bourbon. Set aside on your counter (it is okay, and even preferable, for your filling to be at room temperature).
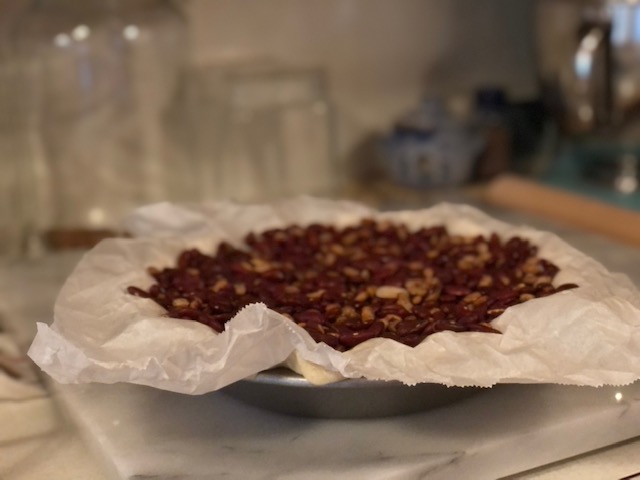
- Once your oven is preheated, line pie crust with parchment paper*** or aluminum foil, making an awning over the edges of the crust to protect from burning, then fill to the top of the crust with dried beans or pie weights.
- Place the prepared crust on a cookie sheet on the bottom rack of oven and bake for 40 minutes, rotating the crust halfway through the baking time.
- When 40 minutes is up, remove crust from oven and carefully remove the dried beans and parchment and save beans indefinitely for blind-baking your crusts. Beat the egg yolk with a pinch of salt and brush the inside of the hot crust with it. Put back in the oven and bake for one more minute. Remove crust from oven and turn the temperature up to 450°.
- If necessary, move whisk slowly through your pie filling, without creating bubbles, in case any of the spices have settled. Pour into hot crust. You will want to have a foil ring or crust shield around the edge of your crust to prevent it from burning.
- Place your pie, still on the cookie sheet, on the center rack of your oven, and bake for 15 minutes in your 450° oven. After 15 minutes, turn the temperature down to 350° and bake for 25 to 30 minutes more, or until the filling is set. I start checking at 25 minutes****. I nudge the pie pan, and if the center of the filling ripples like teeny waves, looking liquidy just under the surface, the pie is not done. Continue to check every 3 minutes or so. When the center of the pie jiggles or trembles (like jello), but no longer has the teeny liquidy ripples, your pie is done. And here’s another thing to look for – the outer circle of the filling will no longer be glossy, but the center, about 3 inches or so, will still be a bit glossy or even look wet. The pie will continue to bake through once it is out of the oven. An over-baked pumpkin pie will be cracked, and the filling grainy. No thank you.
- Remove and let cool on cooling rack for at least 2 hours.
- Optional! If you want to decorate your pie with crust cutouts, roll out your dough scraps extra thin and cut out any festive fall shapes you like. Place on cookie sheet lined with parchment paper. Brush with egg wash (or egg white). Bake in a 400° oven for ten minutes, or until golden brown. Remove and let cool. Once your pie is baked and has cooled completely, decorate with your crust cutouts.
Notes:
*Whatever pie dough you end up making, do not add sugar to the dough. Pumpkin pie is sweet, and it benefits from the contrast of a plain crust. A sweet crust makes the whole thing too sweet!
**I used to use evaporated milk (which works just fine), but once I tried heavy cream, I just couldn’t go back. Your pie will be richer and creamier… delicious! And your cream as well as your eggs really should be at room temperature. Just trust me on this.
***When using parchment paper for blind-baking, I find it helpful to crumple it up first, which makes it more pliable for lining the crust. And on the subject of blind-baking, if you have fond memories of eating pumpkin pie that has a slightly underbaked crust, you can reduce the blind-bake time to 30 minutes. The bottom of your crust will still be crispy, but it won’t be baked completely through.
****I start checking my pie at 25 minutes, because I am pretty sure it won’t be ready by then. I like to see the ripple when I nudge the pie pan, that tells me the pie is not done. That way, when the ripple is no longer there, but the filling still has a slight jiggle, I can tell the difference. I hope that makes sense!

I love the family history recipe card! I also love the jigger of bourbon!
Yes, those old, yellowed recipe cards with little details written in are so precious! And yes to the jigger of bourbon – ha! I have converted pumpkin pie haters to pumpkin pie lovers with a little bourbon and some extra spice! Thanks for reading, Dorothy, and Happy Thanksgiving!
I’ll have to try your pumpkin pie; mind is not one of my favorites!
If you make the pie, let me know what you think! I am making one today, just for the fun of it :).
Pingback: Cornelia’s Pumpkin Pie — and everything nice | My Meals are on Wheels
Pingback: Blind-Baking (prebaking) Your Pie Crust | and everything nice